Breville Light Roast Espresso: Dialing In Guide
Master light roast espresso on your Breville machine. Learn temperature, pre-infusion, and grind strategies to extract bright, complex flavours without sourness.
Light roast espresso broke my brain for three months.
Every shot came out sour, thin, and sharp—like lemon juice with a coffee aftertaste. I kept grinding finer and finer until shots choked. Nothing worked.
Then I learned: light roasts play by different rules. The “standard espresso” approach doesn’t apply. Once I adjusted my expectations (and my technique), those same beans produced shots with fruit-forward sweetness and clarity I’d never tasted before.
This guide is everything I wish I’d known when starting with light roasts on my Breville.
What Makes Light Roasts Harder to Dial In
Solubility, Acidity, and Why “Standard Espresso” Can Taste Sharp
Dark roasts are porous and soluble. Water extracts flavour quickly. Light roasts are dense, hard, and resistant—they need more energy to extract properly.
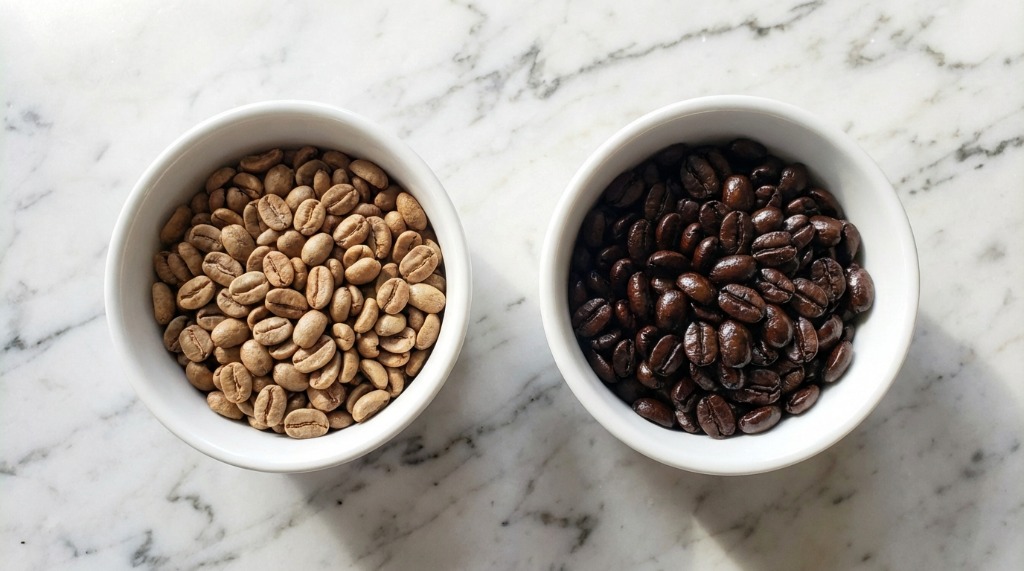 Light roast beans (left) are pale and dense, while dark roast beans (right) are darker and often oily. This physical difference changes how water extracts flavor from them.
When you use a standard 1:2 ratio and 25-30 second extraction on light roast, you often under-extract. You get the bright acids but miss the sugars that balance them.
The result: sour, sharp, thin espresso that tastes like a mistake.
What “Under-Extracted” vs “Over-Extracted” Tastes Like
| Under-Extracted | Over-Extracted |
|---|---|
| Sour, sharp, acidic | Bitter, dry, harsh |
| Thin body, watery | Hollow, ashy |
| Quick finish (nothing lingers) | Unpleasant aftertaste |
| Bright but unbalanced | Muddy, lacks clarity |
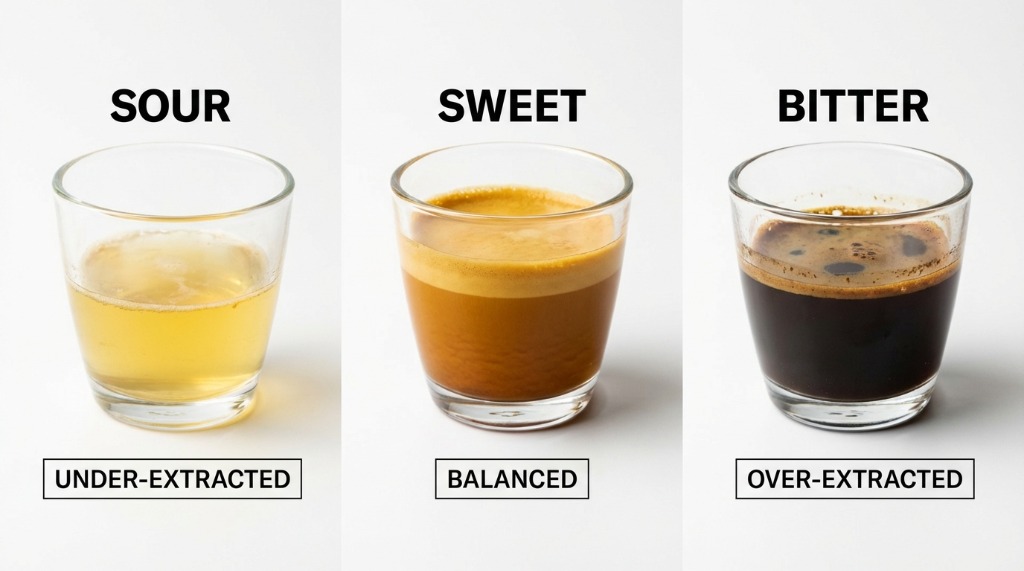 Visualizing the three main stages of extraction: Under-extracted (sour/yellow), Balanced (sweet/amber), and Over-extracted (bitter/dark). Higher density light roasts tend toward the under-extracted side if not pushed properly.
Light roasts tend toward under-extraction. But if you push too hard (grind too fine, brew too long), you’ll hit channeling—which causes both under and over-extraction in the same shot. That tastes confused: sour and bitter.
When the Coffee Itself Is the Issue
Sometimes the bean is the problem, not your technique:
- Too fresh – Coffee needs 7-14 days off roast. Freshly roasted beans (< 5 days) produce excessive CO2, causing channeling and sourness
- Underdeveloped roast – Some light roasts are undercooked, not just light. These taste grassy, vegetal, or hay-like no matter what you do
- Very high density – Some origins (Ethiopian Yirgacheffe, Kenyan) are extremely dense and may exceed your grinder’s capability
If you’ve tried everything and the coffee still tastes wrong, try a different bag before blaming yourself.
Breville Espresso Basics (Know Your Machine)
Typical Breville Workflow
The standard Breville process:
- Grind – Beans into portafilter (timer or weight-based)
- Dose – Verify weight, adjust if needed
- Distribute – Level the grounds (WDT or shake)
- Tamp – Press evenly, level surface
- Pre-infusion – Low-pressure saturation (automatic on most Brevilles)
- Extract – Full pressure brewing
- Evaluate – Taste, note time and yield
For light roasts, steps 5-7 matter most. Pre-infusion and evaluation will make or break your results.
Time, Yield, and Taste as Your Feedback Loop
On Breville machines, you have three variables to track:
- Time – How long from button press to stopping
- Yield – Grams of espresso in the cup
- Taste – Sour/sweet/bitter balance
When dialing in, time follows grind size. Finer grind = longer time. Coarser = shorter. You adjust grind to hit your time target, then evaluate taste.
If taste is off but time is correct, adjust temperature or pre-infusion—not grind.
Built-In Grinder Reality Check
Breville’s built-in grinders have 1.5-2.5g retention. After a grind adjustment, your first shot contains mixed particle sizes from the old setting.
For light roasts (which need precise extraction), this matters. Always purge 3-4g after changing grind settings before pulling your evaluation shot.
Skills You Need (Barista Fundamentals)
Puck Prep Skills That Matter More for Light Roasts
Light roasts are less forgiving. Any puck prep mistake causes channeling, which ruins extraction.
Essential habits:
- Even distribution before tamping (WDT tool or shake method)
- Level tamp with consistent pressure
- Clean basket – no holes clogged with old grounds
- Consistent dose – weigh every time (±0.2g)
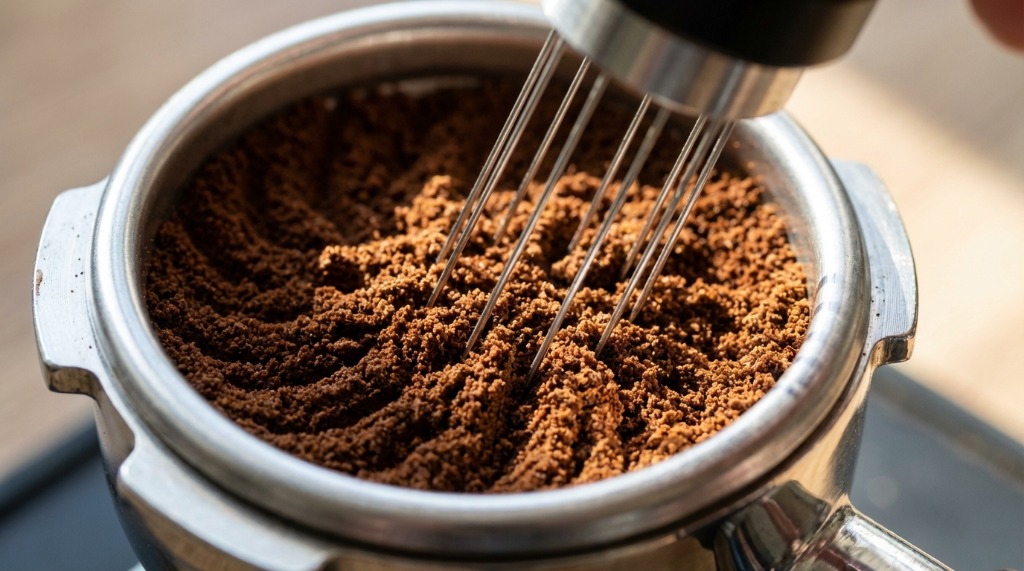 Using a WDT (Weiss Distribution Technique) tool to break up clumps and create a perfectly even bed of coffee. This is critical for light roasts to prevent channeling.
Dark roasts can forgive sloppy prep. Light roasts cannot.
How to Taste Espresso for Dialing-In
Train yourself to identify:
- Sweetness – Caramel, honey, fruit sugar (this is the goal)
- Acidity – Bright fruit vs sour sharpness (good vs bad)
- Body – Syrupy vs watery (more extraction = more body)
- Finish – Clean vs astringent (should linger pleasantly)
A well-extracted light roast tastes like fruit juice: bright, sweet, clean finish. Under-extracted tastes like unripe fruit: sour, thin, harsh.
Note-Taking System: One Change at a Time
Create a simple dial-in log:
| Shot # | Dose | Yield | Time | Grind | Temp | Notes |
|---|---|---|---|---|---|---|
| 1 | 18g | 40g | 28s | 8 | +2 | Sour, thin |
| 2 | 18g | 45g | 32s | 8 | +2 | Better sweetness |
| 3 | 18g | 45g | 32s | 8 | +4 | Sweet, balanced! ✓ |
Dial-In Workflow (One Variable at a Time)
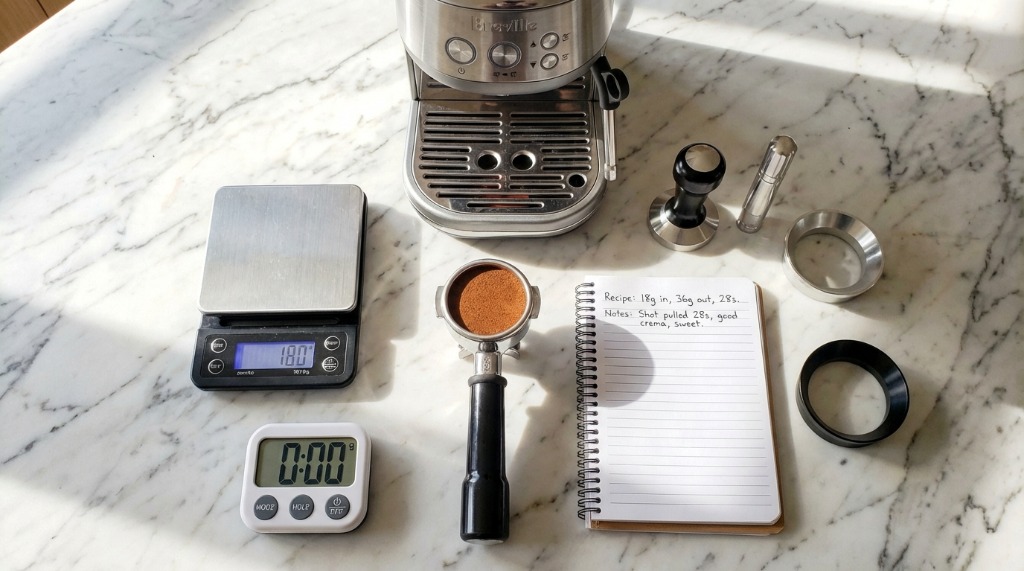 A complete dial-in setup for light roast espresso, including a precision scale, timer, portafilter with prepared puck, and a logbook to track adjustments.
Change ONE variable at a time. Otherwise, you won’t know what worked.
Tools Checklist
Must-Have
- 0.1g scale – For dosing and yield measurement
- Timer – Built into Breville, but visible timer helps
- Clean basket – Unclogged, no buildup
- Proper tamper – Flat, sized to your basket (54mm or 58mm)
Helpful (Optional Upgrades)
- WDT tool – For even distribution (huge impact on light roasts)
- Dosing funnel – Keeps grounds from spilling during distribution
- Distribution tool – Leveler before tamping (optional if WDT is solid)
Water and Temperature Tools
- Kettle – For flushing group head if needed
- Milk thermometer – For consistent steaming (optional)
- Water filter – Already in most Breville tanks
Starting Recipe for Breville + Light Roast
A Safe Baseline
Start here and adjust:
| Parameter | Starting Value |
|---|---|
| Dose | 18g |
| Yield | 40-45g |
| Ratio | 1:2.2 to 1:2.5 |
| Time | 28-35 seconds |
| Temperature | +2°C / +4°F from default |
| Pre-infusion | Maximum available |
This is not the final recipe. It’s a safe starting point that will likely taste better than 1:2 at default temp.
When to Move Beyond 1:2
Standard espresso uses 1:2 (18g in → 36g out). Light roasts often need longer ratios to extract enough sweetness:
- 1:2 – Too short for most light roasts (under-extracted)
- 1:2.5 – Good starting point (18g → 45g)
- 1:3 – For very dense or light-roasted beans (18g → 54g)
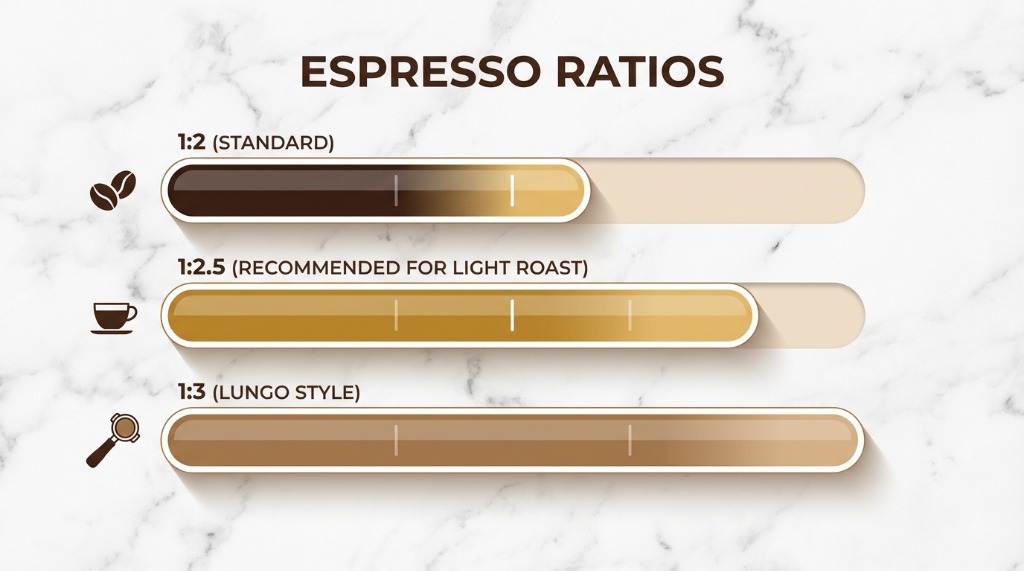 A visual guide to espresso ratios. While 1:2 is the standard for medium-dark roasts, light roasts typically shine at 1:2.5 or even 1:3 to ensure full extraction of sweetness.
Don’t be afraid to pull “lungo-style” shots with light roasts. The extra yield brings out sweetness.
Choosing Basket Size and Dose Strategy
For most Breville machines:
- Double basket (18-20g) is standard for light roasts
- Avoid underfilling (too much headspace = uneven saturation)
- Avoid overfilling (puck touches shower screen = channeling)
If your basket holds 18g comfortably, dose 18g. Don’t force 20g into an 18g basket.
Temperature Strategy (Light Roasts Want More Heat)
Why Higher Brew Temperature Helps
Higher temperature increases extraction rate. Light roasts, being dense and resistant, benefit from that extra heat energy.
On Breville machines with adjustable temperature:
- Default – Usually calibrated for medium roasts
- +2°C (+4°F) – Good starting point for light roasts
- +4°C (+7°F) – For very light or dense beans
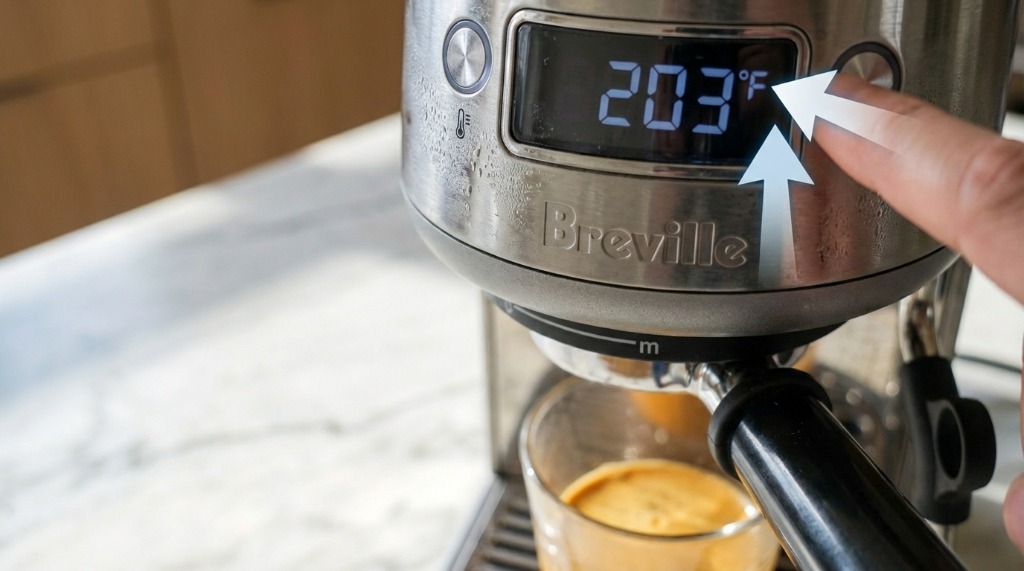 Adjusting the PID settings to a higher temperature (like 203°F/95°C) provides the necessary heat energy to extract sugars from dense light-roasted beans.
Practical Approach: Small Steps
Don’t jump from default to maximum. Adjust in small increments:
- Pull shot at default temp → evaluate
- If sour/thin, increase +2°C → evaluate
- If still sour, increase +2°C more → evaluate
- Stop when sweetness peaks or harshness appears
When Higher Temperature Backfires
If your shot tastes both sour and bitter/harsh after increasing temperature, the problem isn’t temperature—it’s channeling.
Higher temperature +channeling = burnt channels + sour bypassed areas.
Fix puck prep first, then adjust temperature.
Pre-Infusion Strategy (Your Best Lever)
What Pre-Infusion Does
Pre-infusion saturates the puck at low pressure before full extraction. This creates even water distribution and reduces channeling.
For light roasts, longer pre-infusion:
- Allows dense grounds to absorb water
- Reduces channeling risk
- Permits finer grind with less choking
 A bottomless portafilter view during the pre-infusion phase, showing slow, even saturation across the puck before full pressure is applied.
Typical Light-Roast Approach
On Breville machines with adjustable pre-infusion:
- Standard/Auto – May be too short for light roasts
- Extended/Manual – 6-10 seconds improves results
On Barista Express without adjustable pre-infusion:
- Pre-infusion is automatic (tied to pressure buildup)
- Focus on other variables (temp, ratio, grind)
How to Tell If Pre-Infusion Is Helping
Visual cues:
- First drops should appear slowly and evenly (not spurting from one spot)
- Flow should be steady, not sudden
Taste cues:
- More sweetness, less harshness
- Fuller body at same ratio
If longer pre-infusion makes shots taste better, keep it. If no difference, don’t overthink it.
Grind Size and Shot Time (How to Adjust)
If It Runs Fast and Sour
| Symptom | Likely Cause | Fix |
|---|---|---|
| Shot runs < 25 seconds | Grind too coarse | Grind 1-2 steps finer |
| Sour but time is OK | Under-extracted | Increase yield (longer ratio) |
| Sour and thin | Both | Finer grind + longer ratio |
Order of operations: Fix time first (via grind), then adjust ratio if still sour.
If It Chokes or Tastes Dry
| Symptom | Likely Cause | Fix |
|---|---|---|
| Shot barely drips / chokes | Grind too fine | Grind 1-2 steps coarser |
| Bitter/dry/harsh | Over-extracted or channeling | Coarser grind OR improve puck prep |
| Bitter AND sour | Channeling | Focus on distribution, not grind |
Channeling confusion: When you see uneven flow (spurting, blonde spots), fix puck prep before adjusting grind.
The “One Variable at a Time” Workflow
- Lock dose – 18g, don’t change it
- Set yield target – 45g for light roasts
- Adjust grind to hit 28-32 seconds
- Evaluate taste – sour/sweet/bitter
- Fine-tune temp if needed (+2°C at a time)
- Fine-tune pre-infusion if needed
Never change two variables between shots. You’ll lose track.
Step-by-Step Dialing Workflow
The Complete Process
Step 1: Lock Dose
- Weigh 18g of beans
- Grind into portafilter
- Verify weight (should be ~16-17g due to retention on first shot)
Step 2: Set Yield Target
- Place cup on scale under portafilter
- Target 40-45g output for light roasts
- Tare scale, start shot
Step 3: Adjust Grind
- If shot runs < 25 seconds → finer
- If shot runs > 35 seconds → coarser
- Purge 3-4g after adjusting before next shot
Step 4: Fine-Tune Temp/Pre-Infusion
- If taste is sour after hitting time target → increase temp
- If taste is bitter → decrease temp or check puck prep
- Extend pre-infusion if available
Flushing After Grind Changes
After every grind adjustment:
- Run grinder for 3-4 seconds into waste container
- This clears old-grind particles from the chamber
- Your next shot reflects the actual new setting
Skip this step and your “test shot” is contaminated with old grind sizes.
How Many Test Shots You Need
Realistic budget for dialing in new light roast beans:
- 3-4 shots to find ballpark (grind, time)
- 2-3 shots to fine-tune (temp, ratio)
- Total: 5-7 shots before dialed in
Yes, that’s 90-120g of coffee. Factor this into your bean budget for specialty light roasts.
Waste reduction tip: Drink or share your test shots. They’re drinkable (just not perfect). Use them in milk drinks where nuance matters less.
Milk Steaming with Light-Roast Espresso
Why Light Roasts Can Taste “Thin” in Milk
Light roast espresso has less body and fewer roasty flavours that “cut through” milk. A flat white with light roast can taste like… warm latte-flavoured milk.
Compensation strategies:
- Stronger ratio – Pull 1:2 or shorter for milk drinks (more concentration)
- Less milk – Cortado or piccolo instead of latte
- Higher dose – 20g instead of 18g for more intensity
Steaming Targets
For milk drinks with light roast:
- Texture – Aim for fine microfoam (glossy, no visible bubbles)
- Temperature – 55-60°C (130-140°F) — slightly lower preserves milk sweetness
- Consistency – Same stretch, same swirl, same result
Overheated milk masks espresso nuance. Keep it cooler for light roasts.
Matching Drink Style to Roast
| Drink | Light Roast Approach |
|---|---|
| Flat White | Pull shorter ratio (1:1.5), less milk |
| Cappuccino | Standard ratio, thick foam for contrast |
| Latte | Consider higher dose or shorter ratio |
| Cortado | Perfect for light roasts—small, concentrated |
Light roasts shine in small milk drinks where espresso isn’t drowned.
Hygiene and Safety
Grinder and Group Area Cleanliness
Old grounds = stale flavours contaminating your bright, fresh light roast.
- Daily: Wipe portafilter, group head, and basket
- Weekly: Brush grinder chute, clean shower screen
- Monthly: Deep clean burrs, descale if needed
Light roasts reveal every flaw. Cleanliness matters more.
Milk Safety
- Purge steam wand before and after every use
- Wipe immediately with damp cloth after steaming
- Clean pitchers daily (milk residue goes rancid)
- Don’t re-steam old milk
Safe Workflow Order
- Brew espresso (no steam yet)
- Steam milk (be aware of hot steam)
- Combine drink
- Immediately purge and wipe steam wand
- Clean up workspace
This order minimizes burns and keeps equipment clean.
Troubleshooting Guide
Sour, Sharp, Thin (Under-Extracted)
Symptoms: Lemon-like acidity, no sweetness, watery body
Fixes:
- Increase yield (try 1:2.5 or 1:3)
- Grind finer (add 1 second to shot time)
- Increase temperature (+2°C)
- Extend pre-infusion time
Bitter, Dry, Hollow (Over-Extracted or Channeling)
Symptoms: Harsh aftertaste, burnt notes, empty mouthfeel
Fixes:
- Check puck prep (distribution, tamp)
- Grind coarser if time > 35 seconds
- Decrease temperature (-2°C)
- Reduce yield if already long
Inconsistent Shots (Good One Day, Bad the Next)
Symptoms: Yesterday’s recipe doesn’t work today
Causes:
- Retention/exchange – Purge grinder between sessions
- Uneven distribution – Improve WDT technique
- Bean age – Flavour changes as beans degas (adjust every few days)
- Unstable routine – Weigh everything, time everything
Career-Path Angle (Aspiring Baristas)
What Cafés Look For
Specialty cafés often serve light roasts. If you can dial in light roast espresso consistently, you’re ahead of most applicants.
Key skills employers notice:
- Repeatability (same shot, every time)
- Cleanliness (station stays organized)
- Speed under pressure (dial-in quickly, not endlessly)
- Taste vocabulary (can describe what’s wrong and how to fix it)
A 2-Week Practice Plan
Week 1:
- Day 1-3: Dial in one light roast, document everything
- Day 4-5: Pull 10 identical shots, evaluate consistency
- Day 6-7: Practice milk drinks with that shot
Week 2:
- Day 8-10: Switch to different light roast, dial in from scratch
- Day 11-12: Speed challenge (dial in under 5 shots)
- Day 13-14: Full service simulation (espresso + milk + cleanup, timed)
Building a Dial-In Log Portfolio
Keep a documented log of your dial-ins:
- Bean name, roaster, roast date
- Dose, yield, time, temperature for final recipe
- Number of shots to dial in
- Tasting notes (before and after)
This shows employers you understand process, not just results.
FAQs
What ratio is best for light roast espresso on Breville?
Start with 1:2.5 (18g in → 45g out). Many light roasts taste best at 1:2.5 to 1:3. Standard 1:2 often under-extracts.
Should I increase brew temperature for light roasts?
Yes, typically +2 to +4°C above default helps extract more sweetness from dense light roasts. Adjust in small steps.
How long should pre-infusion be for light roasts?
Longer is usually better—6-10 seconds if your machine allows. This helps even saturation and permits finer grind.
Why does my light roast taste sour no matter what?
Common causes:
- Beans too fresh (wait until 7-14 days off roast)
- Ratio too short (try 1:2.5 or longer)
- Temperature too low (increase +2°C)
- Underdeveloped roast (try different beans)
Can Breville built-in grinders handle light roast espresso consistently?
Yes, but it requires more attention. Purge after adjustments, maintain cleanliness, and accept some limitations in adjustment precision. An external grinder makes light roasts easier.
Conclusion
Light roast espresso isn’t harder—it’s different. Once you understand that light roasts need:
- Longer ratios (1:2.5+)
- Higher temperatures (+2 to +4°C)
- Extended pre-infusion
- Precise puck prep
…you’ll unlock flavours that dark roasts can’t offer. Fruit-forward sweetness, floral aromatics, clean brightness. It’s worth the learning curve.
Your turn: Share your bean (roaster, roast date), dose, yield, time, and temperature setting in the comments. I’ll suggest your next 2-3 adjustments to dial it in.
Mikael
Home espresso enthusiast and Breville specialist. Helping you master the art of coffee brewing from your own kitchen.
Learn more about me →