Breville OPV Mod: Adjust Pressure to 9 Bars
Learn how to adjust your Breville's Over-Pressure Valve (OPV) to 9 bars for better espresso extraction. Step-by-step guide with safety warnings and troubleshooting.
Adjusting your Breville’s OPV might be the single most impactful modification you can make—if you’re ready for it.
This isn’t a mod for everyone. But if you’re frustrated with shots that always taste over-extracted, a pressure gauge pinned to the right, or dial-in windows that feel impossibly narrow—the OPV mod can unlock flexibility you didn’t know you were missing.
Introduction
Who Should Consider This Mod
OPV modification is right for you if:
- You’re comfortable opening your espresso machine’s casing
- You have (or are willing to buy) a pressure gauge
- You understand basic espresso dial-in concepts
- You accept that warranty coverage may be voided
Not right for you if:
- You’re new to espresso
- You don’t have a blind basket or pressure gauge
- You’re not comfortable with the risk of damage or leaks
Expected Results
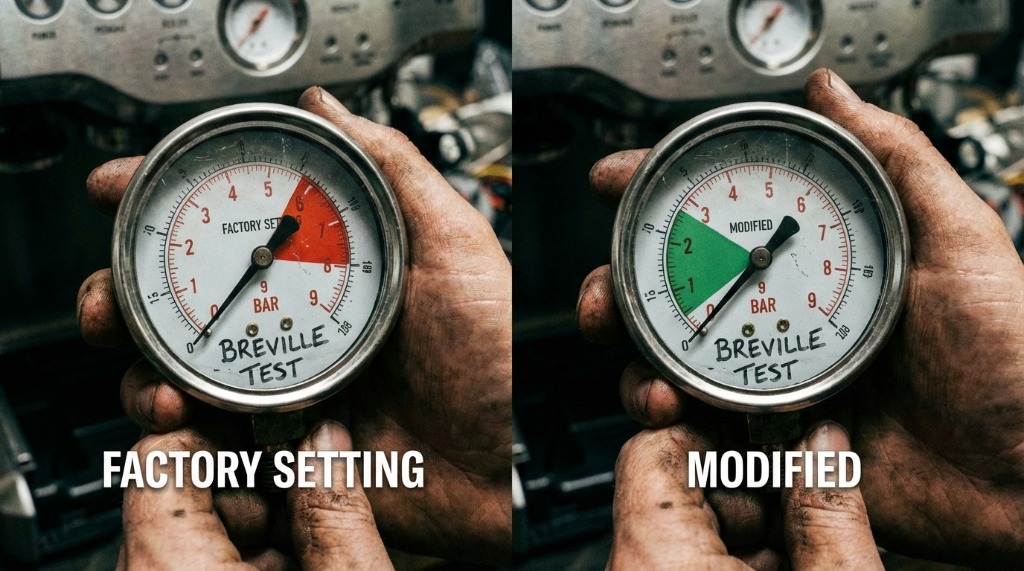 A comparison of internal pressure readings. The factory setting (left) often pushes 12-15 bar, while the modified setting (right) limits pressure to the optimal 9 bar “sweet spot” for extraction.
After adjusting OPV to ~9 bar, most home baristas report:
- Easier dial-in – Wider adjustment window, less “jumping” from under to over
- More balanced flavour – Sweetness emerges without harshness
- More consistent shots – Less pressure variation between shots
Are results guaranteed? No. But for many Breville machines with factory settings of 12-15 bar, lowering to 9-10 bar often makes a noticeable difference.
What Is OPV and Why 9 Bars?
OPV Definition
OPV = Over-Pressure Valve.
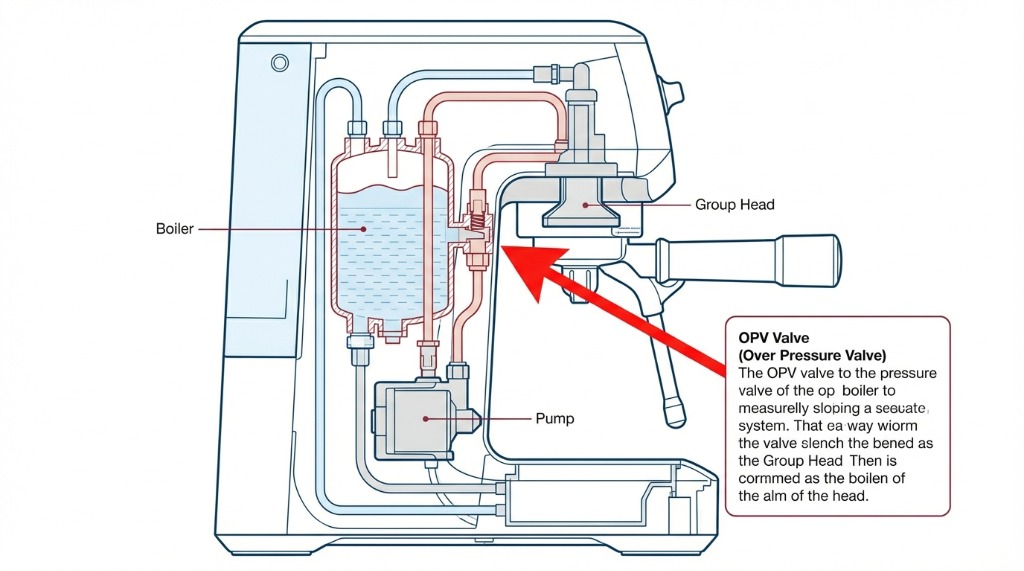 An internal diagram showing the location of the Over-Pressure Valve (OPV) relative to the pump and the boiler inside a standard Breville espresso machine.
This component limits maximum pressure by releasing excess pressure. When the pump generates pressure higher than the OPV setpoint, the valve opens and diverts some pressure back to the water tank.
Without an OPV, pressure could rise until the pump fails or other components leak.
Why 9-10 Bar Is Called the “Sweet Spot”
Optimal espresso extraction happens around 9 bar brew pressure. This isn’t a magic number—it’s the result of decades of experimentation in the coffee industry.
Below 9 bar → Under-extraction becomes more likely Above 10-11 bar → Channeling and over-extraction happen more often
Many home espresso machines (including some Breville models) leave the factory with OPV set to 12-15 bar. This is “safe” for the machine but not optimal for taste.
Pump Pressure vs OPV Setting vs Brew Pressure
| Term | Meaning |
|---|---|
| Pump pressure | Maximum pressure the pump can generate (usually 15+ bar) |
| OPV setting | The limit set on the valve; pressure above this is released |
| Brew pressure | Actual pressure during extraction with a puck; usually 1-2 bar below OPV |
Example: If OPV is set to 12 bar, brew pressure during extraction might be 10-11 bar. If you want 9 bar brew pressure, OPV needs to be set around 10-10.5 bar.
How to measure OPV setting: Use a blind basket (blocked portafilter). The pressure reading is the OPV limit—since there’s no flow, all pressure is retained.
Risk, Warranty, and Safety Warnings
Common Risks
- Warranty void – Opening the machine casing typically voids warranty
- Potential leaks – If reassembly isn’t tight, water can escape from connections
- Incorrect component installation – Clips or hoses not properly seated can cause problems
- Permanent damage – Overly aggressive modification can damage seals or springs
Safety Checklist Before Opening the Machine
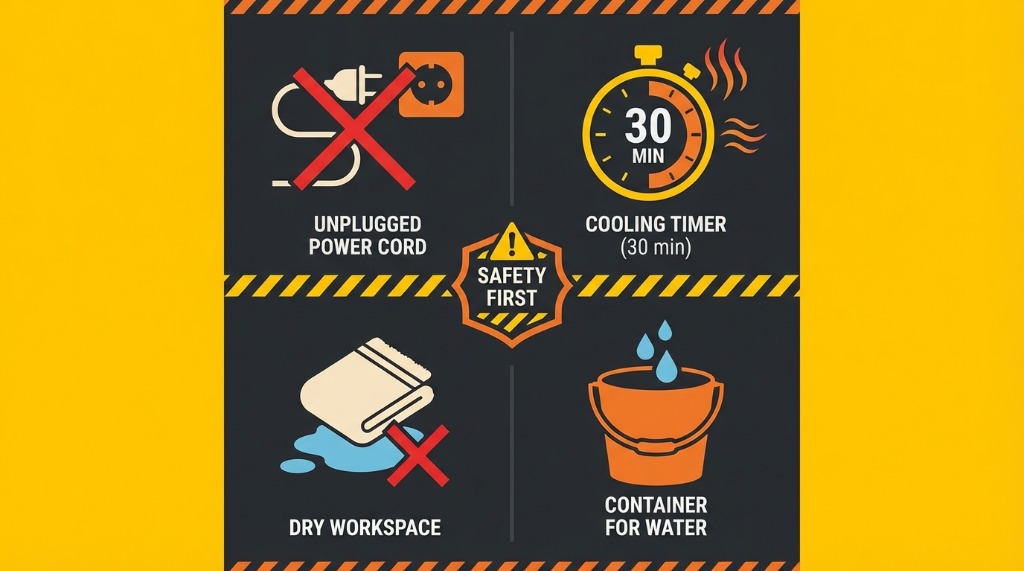 Critical safety steps before beginning the OPV mod: Unplug the power cord, WAIT 30 minutes for components to cool, ensure a dry workspace, and have a container ready for residual water.
-
✅ Unplug power – Never work on a machine connected to electricity
-
✅ Let machine cool – Wait at least 30 minutes after last brew
-
✅ Work in dry area – Keep water away from your work surface
-
✅ Prepare containers – To catch residual water in the system
-
✅ Document everything – Photo each step before removing components
When You Should NOT Do the OPV Mod
- You’re uncomfortable disassembling electronics
- You don’t have a pressure gauge or blind basket
- Your machine is still under warranty and you don’t want to lose coverage
- You don’t have time for iterative testing
If any of these apply, consider having an experienced technician do the work.
Relevant Breville Models (Compatibility)
Breville Models with Adjustable OPV
Most Breville home espresso machines have an adjustable OPV:
- Barista Express (870XL) – OPV adjustable
- Infuser (840XL) – OPV adjustable
- Dual Boiler (900XL) – OPV adjustable, but usually already set lower from factory
- Barista Pro – OPV adjustable
- Barista Touch – OPV adjustable
Important Note
Some newer Breville models (2023+) already ship with lower pressure than older generations. Check your pressure first before deciding to mod.
How to check: Install blind basket → brew → read the built-in or external pressure gauge.
If it already shows 9-10 bar with blind basket, you may not need the mod at all.
How to Measure Pressure Correctly
Method 1: Pressure Gauge + Blind Basket (Most Accurate)
What you need:
- Blind basket / cleaning disk
- External pressure gauge (attached to portafilter or T-fitting)
Steps:
- Attach pressure gauge to portafilter or T-fitting
- Install blind basket (or cleaning disk without holes)
- Lock portafilter, start brew
- Read the pressure reached (this is the OPV limit)
Target: With blind basket, you want a reading around 10-10.5 bar, which will produce ~9 bar brew pressure during normal extraction.
Method 2: Built-In Breville Gauge
Many Breville machines have a pressure gauge on the front panel.
Limitations:
- Built-in gauges are often less accurate than external gauges
- “Espresso zone” interpretation varies between models
- Readings differ between blind basket and normal extraction
How to use: With blind basket, the needle should be at or slightly above the upper limit of the “espresso zone.” If the needle pins to the far right, pressure is too high.
Understanding Reading Differences
| Condition | Relative Reading |
|---|---|
| Blind basket | Highest (shows OPV limit) |
| Normal extraction | 1-2 bar lower than blind |
| No puck (empty portafilter) | Very low (pump has no resistance) |
This matters: Don’t compare blind basket readings to normal shot readings—they’re different measurements.
Tools and Parts Needed
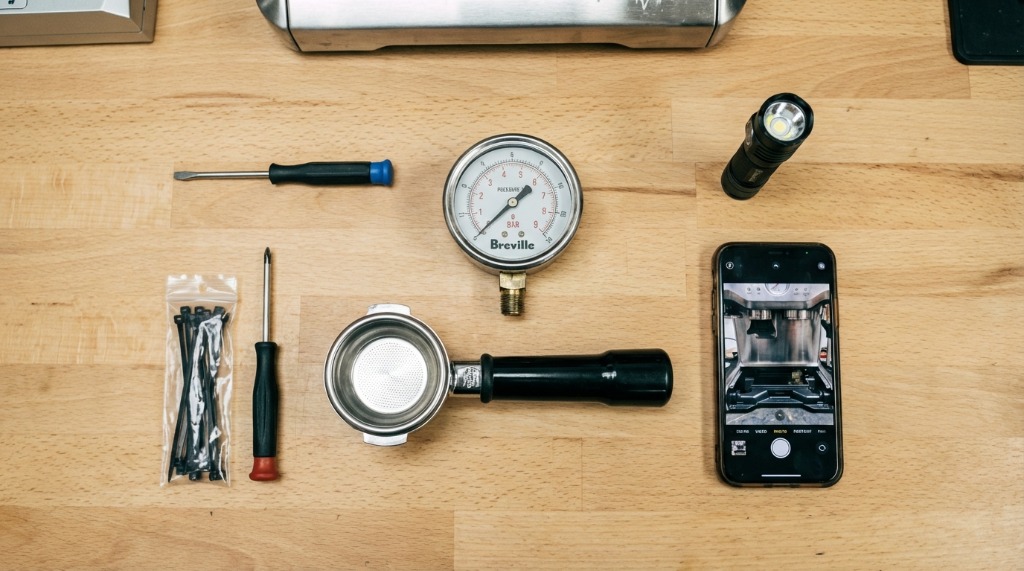 A look at the tools needed for the OPV mod: Screwdrivers (various sizes), a pressure gauge, cable ties, a flashlight for internal inspection, and a phone to document the wiring and component layout.
Required
- Correct screwdriver – Check head type (Phillips, Torx, or flat). Magnetic tip is safer so screws don’t fall inside
- Blind basket / cleaning disk – For measuring OPV pressure
- Replacement cable ties – Some cables may need to be cut for access; have replacements ready
Optional But Very Helpful
- External pressure gauge kit – More accurate than built-in gauge
- Camera/phone – For documenting cable, hose, and component positions before removal
- Flashlight – For seeing components in dark areas
- Small containers – For storing screws so they don’t get lost
Modification Mechanisms (Two Common Approaches)
Option A: Adjust OPV by Loosening the Valve
Principle: Most OPVs can be adjusted by turning a screw that presses on a spring. Loosening (unscrewing) lowers the pressure setpoint.
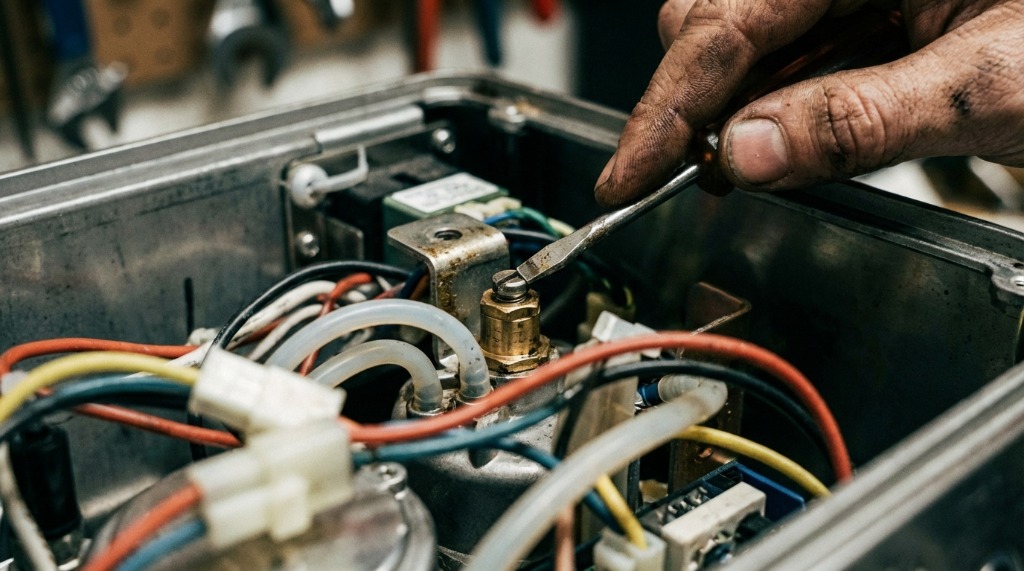 A close-up of the brass Over-Pressure Valve (OPV) being adjusted with a flathead screwdriver. Turning this screw counter-clockwise reduces the spring tension, which lowers the maximum brew pressure.
General steps:
- Access OPV (usually near the pump, back/side of machine)
- Turn adjustment screw 1/4 turn counter-clockwise
- Test pressure with blind basket
- Repeat until approaching target
Advantages:
- Relatively simple
- Reversible (can return to original setting)
Disadvantages:
- Some units can’t reach 9 bar with adjustment screw alone
- Limited adjustment range
Option B: Spring/Component Modification
When needed: If you’ve loosened the adjustment screw almost completely but pressure is still 11-12 bar.
Approach:
- Replace OPV spring with a weaker one
- Or add shims/spacers to change tension
Risks:
- More invasive than simple adjustment
- Requires stricter testing
- If done wrong, can cause pressure too low or unstable
Recommendation: Start with Option A. Only consider Option B if Option A isn’t sufficient.
Step-by-Step Workflow
Step 1: Baseline Test (Before Mod)
Before opening anything:
- Install blind basket
- Run brew cycle
- Record pressure reading (photo the gauge if possible)
- Also record your current espresso recipe (grind, dose, yield, time)
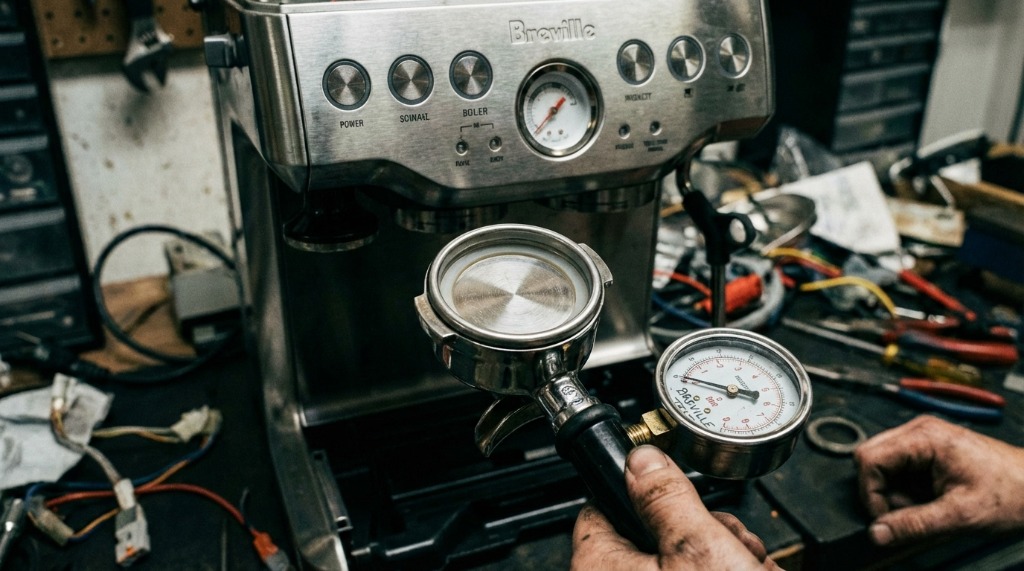 Using a blind basket (a filter basket with no holes) and an external pressure gauge to measure the maximum pressure limit of the Over-Pressure Valve (OPV) before making adjustments.
This is your baseline. After modification, you can compare for changes.
Step 2: Open Casing and Access OPV
- Unplug power – Confirm it’s completely disconnected
- Remove casing screws (usually on back/sides)
- Photo initial positions – Before removing any cables or hoses
- Identify OPV location (usually near pump, has adjustment screw)
- Note starting position of adjustment screw (how many turns from fully tight)
Step 3: Make Small Incremental Adjustments
Iteration principle:
- Turn adjustment screw 1/4 turn counter-clockwise
- Reassemble casing (at least partially for safety)
- Test pressure with blind basket
- Record result
- Repeat until approaching 10-10.5 bar (blind basket reading)
Don’t turn too much at once. One quarter turn can change pressure by 0.5-1 bar.
Step 4: Reassemble and Check for Leaks
After reaching target:
- Ensure adjustment screw is locked (won’t turn on its own)
- Reinstall all removed components
- Replace any cable ties that were cut
- Run machine and check for leaks – Watch connection points
If you see wet spots, turn off machine, unplug, and tighten connections.
Step 5: Final Verification
- Blind basket test – Confirm pressure matches target
- Normal extraction test – Brew espresso with puck, observe flow and pressure
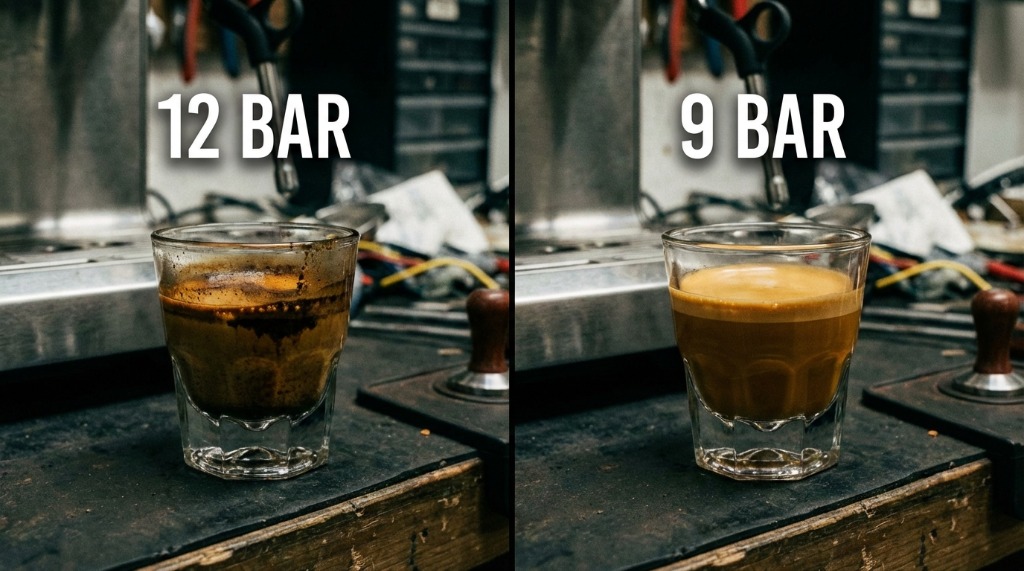 A visual comparison of shot quality. The 12-bar shot (left) shows signs of uneven extraction and harshness, while the 9-bar shot (right) features a richer, more stable crema and a more balanced flavor profile.
-
Stability check – Run 3-5 shots to ensure consistency
-
Document – Record final setting (total turns from baseline)
Re-Dialing After OPV Mod
Why Your Old Recipe May Change
Lower pressure changes flow rate. Shots that were previously “perfect” may now:
- Run faster (because effective resistance decreases)
- Taste different (more or less extracted)
Don’t panic. This is normal. You need to re-dial.
Recommended Dial-In Sequence
- Lock dose – Keep using the same dose (e.g., 18g)
- Target yield – Keep using the same ratio (e.g., 1:2 → 36g)
- Adjust grind – Until shot time hits 25-30 seconds
- Fine-tune taste – Adjust yield or temp if needed
Starting Point
Begin with “classic” 1:2 ratio:
- 18g in → 36g out
- Target 25-30 seconds
If result is too sour → grind finer or increase yield If result is too bitter → grind coarser or decrease yield
With 9 bar pressure, you have more room to adjust than with 12-15 bar.
Troubleshooting
Pressure Jumps Around / Unstable
Possible causes:
- Spring or seal not seated properly after mod
- Adjustment screw not locked tight
- Debris entered valve during open/close
Actions:
- Reopen and check component positions
- Ensure no debris in valve area
- Tighten adjustment and retest
Leaking After Reassembly
Possible causes:
- Clamp or clip not properly seated
- Hose not fully inserted into fitting
- O-ring damaged or out of position
Actions:
- Identify leak point (run machine briefly, observe where water escapes)
- Recheck every connection that was opened
- Replace O-ring if needed
Pressure Won’t Drop to 9 Bar
Possible causes:
- Your model’s OPV design has adjustment limits
- OPV spring is too strong for 9 bar target
Actions:
- Consider spring modification (with understanding of higher risk)
- Or accept the lowest achievable setting (10-11 bar is still better than 15 bar)
- Consult community forums (Reddit r/espresso, Home-Barista)
FAQ
Is 9 Bar a Target or the OPV Maximum Limit?
9 bar is the target brew pressure during extraction with a puck.
OPV setting is usually 1-2 bar higher because:
- Blind basket shows OPV limit (pressure without flow)
- Normal extraction has flow, so pressure is slightly lower
So if you want 9 bar brew pressure, set OPV around 10-10.5 bar (measured with blind basket).
Do All Breville Machines Need OPV Mod?
No. Some models (especially newer or high-end like Dual Boiler) already have factory settings close to optimal.
Check your pressure first before deciding to mod. If blind basket already shows 10-11 bar, you may not need the modification.
Does OPV Mod Help Reduce Channeling?
It can help, but not directly.
Lower pressure gives the puck more time to saturate before full pressure. This can reduce channeling—but poor puck prep will still cause channeling at any pressure.
OPV mod is not a substitute for good distribution and tamping.
How Long Does It Take and How Often to Re-Check?
First time: 1-2 hours (including learning and documentation)
Re-check: After the mod stabilizes, pressure shouldn’t change. Re-check if:
- You replace other components (pump, hoses)
- Machine behaviour changes unexpectedly
For most users, one modification is sufficient.
Conclusion
Realistic Expectations
OPV mod isn’t a magic bullet, but for machines with factory settings of 12-15 bar, lowering to 9-10 bar often provides:
- Wider dial-in window
- Easier access to sweetness
- More forgiving shots despite minor puck prep errors
- Better flavour clarity
Results vary depending on machine, beans, and individual skill—but this mod is high-impact for relatively moderate effort.
Share Your Setup
Post in the comments:
- Your Breville model (Barista Express, Infuser, Dual Boiler, etc.)
- Whether you have a pressure gauge (built-in or external)
- Your current blind basket pressure reading
I’ll help create a target adjustment plan and the safest testing sequence for your specific setup.
Mikael
Home espresso enthusiast and Breville specialist. Helping you master the art of coffee brewing from your own kitchen.
Learn more about me →