Understanding Channeling: Why Your Shot Sprays Everywhere
Fix espresso channeling with proper puck prep, WDT technique, and distribution. Complete guide to diagnosing and preventing uneven extraction.
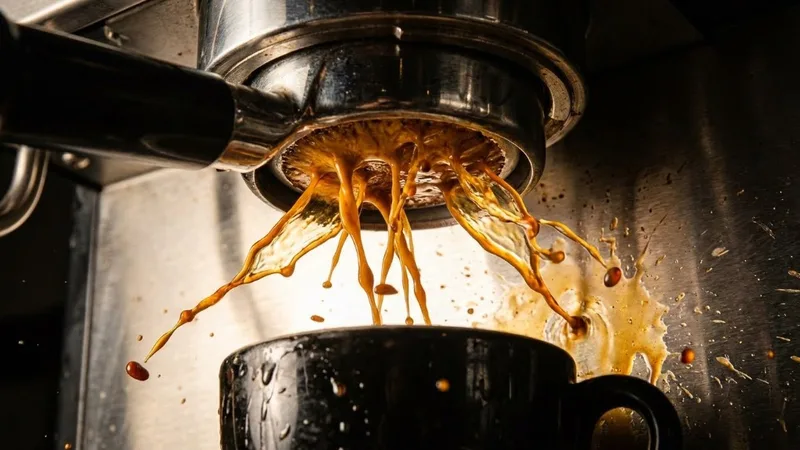
First time I used a bottomless portafilter, the shot sprayed in three different directions and hit my cabinet. Didn’t make it into the cup at all. That was my introduction to channeling—the espresso issue that turns a perfectly dialed-in recipe into a sour, bitter, watery disaster.
Espresso channeling happens when water blasts through weak spots in your puck instead of extracting evenly. Some areas get hammered with too much water (over-extracted), others barely get touched (under-extracted), and you end up with a confused mess of flavors.
Good news is it’s fixable. Once I learned what causes it and how to prevent it, my shot consistency improved dramatically. Let me share what actually works.
What Is Channeling and How Does It Happen?
At its core, channeling is water finding the path of least resistance through your coffee puck.
Think of your portafilter as a dense forest. Ideally, water percolates through every tree (coffee particle) evenly. But if there’s a clearing—a weak spot, a clump, a gap—water rushes through that opening, creating a channel that funnels most of the flow.
Why It Ruins Your Shot
This isn’t a minor problem. Channeling wrecks extraction completely:
- Channel zones: Get blasted with prolonged water contact = bitter over-extraction
- Bypassed zones: Stay under-extracted = sour, acidic notes
- Result: Weak shot overall with muddled, confused flavors and thin crema
You get the worst of both worlds—sour AND bitter simultaneously. The shot tastes like under-extracted slop even though you pulled the right volume.
The Science Behind the Spray
Espresso extraction runs at 9 bars of pressure pushing 92-96°C water through finely ground coffee. When puck density isn’t uniform:
- Water takes the easy path (like electricity finding least resistance)
- Channel opens wider as more water flows through
- Creates a feedback loop—channels get worse as the shot progresses
- You end up with spray, spurts, and uneven flow
Visual Signs and Diagnosis
Using a Bottomless Portafilter
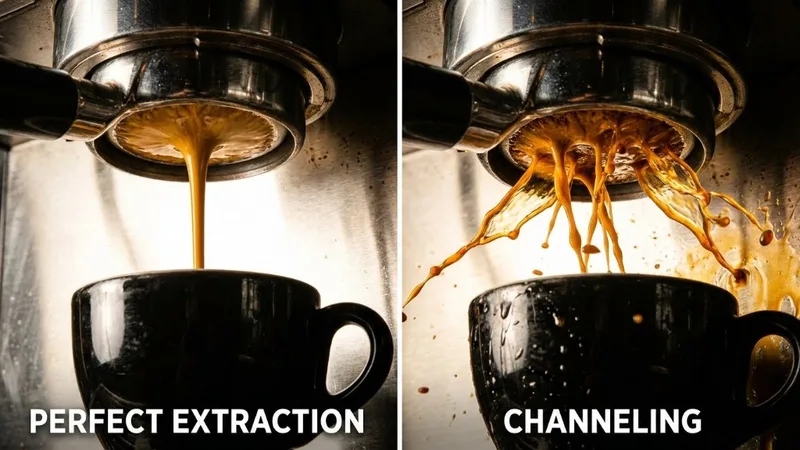
The bottomless (naked) portafilter is hands down the best diagnostic tool. Without the spouts, you see exactly what’s happening:
| What You See | What It Means |
|---|---|
| Even curtain of espresso | Perfect extraction ✓ |
| Spurting from sides | Side channeling |
| Blonde streaks in dark flow | Mid-puck channels |
| Spraying at start, calming down | Early channel that sealed up |
| Multiple thin streams | Severe channeling |
If you don’t own one, grab a bottomless portafilter. It’s the best $30 you’ll spend on espresso gear.
Reading Your Puck After Extraction
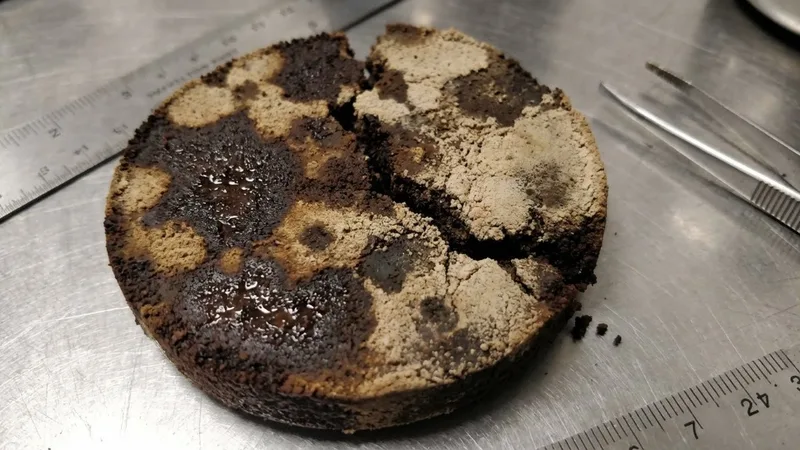
Pop out the puck and examine it:
| Puck Sign | What It Tells You |
|---|---|
| Uniform color and moisture | Good extraction |
| Wet spots or visible holes | Water concentrated there |
| Dry patches | Under-extracted areas |
| Craters or washouts | Severe channeling |
| Soupy/muddy texture | Extreme channeling |
Taste Test
Channeling creates a distinctive confused flavor profile:
- Sour AND bitter at the same time—this is the classic giveaway
- Thin body despite normal extraction timing
- Harsh finish with no sweetness
- Inconsistent from shot to shot with identical recipe
Compare this to pure under-extraction (just sour) or pure over-extraction (just bitter). When you’re getting both simultaneously, channeling is almost certainly the problem.
Common Causes of Channeling
Understanding why it happens helps you target your fixes:
1. Poor Grind Distribution
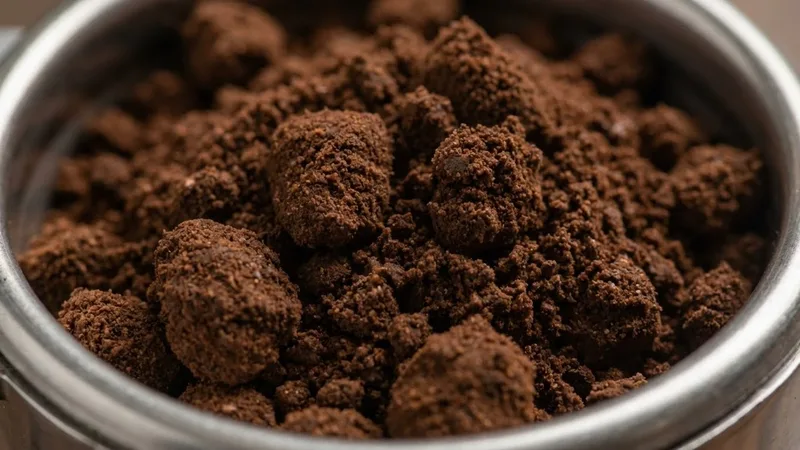
Coffee lands in the basket unevenly. It clumps. It piles higher on one side. Creates density variations from the start.
Signs:
- Grounds visibly higher on one side
- Clumps sitting on top before you tamp
- Different color zones in the extracted puck
2. Inconsistent Grind Quality
Cheap grinders produce a mix of super-fine particles (“fines”) and larger pieces (“boulders”). This creates natural weak spots.
Signs:
- Visible particle size variation when you look closely
- Fines settling to bottom, creating an impermeable layer
- Boulders leaving gaps where water flows fast
3. Uneven Tamping
Tilted or inconsistent tamp pressure means one side of the puck is denser than the other.
Signs:
- Surface looks sloped after tamping
- One side extracts noticeably before the other
- You can feel the portafilter tilting when you tamp
4. Edge Gaps
Space between the puck and basket walls is a classic channel location. Water loves edges.
Signs:
- Spray from the edges in bottomless portafilter
- Ring of darker extraction around outside
- Coffee not filling the basket edge-to-edge
5. Dosing Issues
Too much or too little coffee creates problems:
| Issue | What Happens |
|---|---|
| Overdosed | Puck touches shower screen, creates weak spot when you lock in |
| Underdosed | Puck moves during extraction, opening channels |
| Inconsistent | Different results shot to shot |
6. Very Fresh Beans
Beans under 5-7 days post-roast are still releasing CO2 like crazy. During extraction, those bubbles create pathways for water.
Prevention Techniques
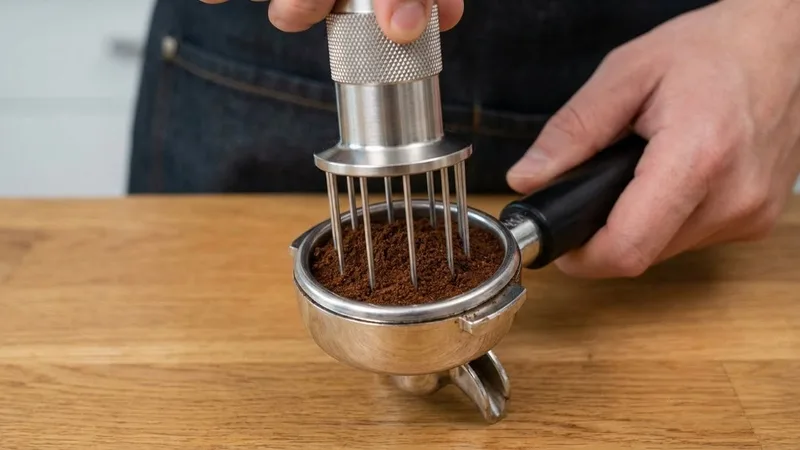
The WDT Method (Weiss Distribution Technique)

This single technique fixed about 80% of my channeling problems.
What you need: Thin needles (0.3-0.4mm) in a handle. You can buy a proper tool or make one from 3D printer needles or acupuncture needles in a cork.
How to do it:
- Grind into portafilter like normal
- Insert WDT tool into the grounds
- Stir in circular and figure-8 motions
- Work through the entire depth—not just the surface
- Break up every clump you find
- Gentle tap on counter to settle grounds
- Level the surface before tamping
Why it works: You’re physically homogenizing particle distribution, eliminating clumps, and creating uniform density throughout the puck.
Distribution Tools (OCD, Wedge, etc.)
These spinning/wedging tools level the surface before tamping:
Pros:
- Quick and consistent
- Creates perfectly flat surface
- Reduces edge gaps
Cons:
- Not a replacement for WDT
- Can compress just the top layer unevenly
- Doesn’t fix clumping at depth
Best practice: Use WDT first to break clumps, then distribution tool for level surface, then tamp.
Proper Tamping Technique

- Level first: Make sure surface is flat before pressing
- Press straight down: Keep tamper perfectly level—no tilting
- Consistent pressure: 30 lbs is the guideline (firm, not maximum force)
- Light polish if desired: Slight twist at the end
- Never tap the side: This creates those edge gaps
Pre-Infusion (If Your Machine Has It)
Pre-infusion gently wets the puck before full pressure kicks in. This allows more even saturation:
- Helps seal minor distribution issues
- Reduces chance of early channeling
- Particularly helpful for light roasts
Step-by-Step Channeling Fixes
Work through this systematically:
Step 1: Diagnose the Problem
- Use a bottomless portafilter for 3-5 shots
- Record video of each extraction (super helpful for analysis)
- Note where spurts originate—center, edges, specific spots
- Examine pucks after each shot
- Look for patterns
Step 2: Implement WDT
If you’re not already doing this:
- Get or make a WDT tool
- Use it for every single shot
- Spend 5-10 seconds really distributing
- This alone fixes most channeling
Step 3: Check Your Grind Consistency
If WDT doesn’t completely solve it:
- Really look at your grounds—seeing obvious fines and boulders?
- Consider upgrading your grinder (this is often the real issue)
- Make sure burrs are clean and aligned
- Single-dose to avoid retention issues
Step 4: Refine Your Workflow
Optimize each step:
- Dose: Use scale, aim for ±0.2g consistency
- Distribute: Thorough WDT
- Level: Tool or palm to flatten
- Tamp: Straight, level, consistent
- Lock: Insert portafilter gently—don’t knock it around
Step 5: Adjust Variables
If problems persist:
- Grind slightly coarser: Reduces extreme resistance
- Reduce dose by 0.5-1g: Creates headroom
- Check shower screen: Clean any blockages
- Try different beans: Some are just more forgiving
Troubleshooting Persistent Channeling
Channeling at Edges Only
Likely causes:
- Dose too high—puck expanding against walls
- Poor edge distribution
- Basket wearing out
Fixes:
- Reduce dose by 1g
- Focus WDT specifically on edges
- Inspect basket for wear marks
Channeling at Center Only
Likely causes:
- Grounds mounding in the middle
- Donut-shaped distribution
- Tamp not level
Fixes:
- Level grounds before tamping
- Use distribution tool
- Practice keeping tamper straight
Random/Inconsistent Channeling
Likely causes:
- Inconsistent workflow shot to shot
- Variable dose amounts
- Grinder retention mixing old and new grounds
Fixes:
- Standardize every step
- Weigh every single dose
- Single-dose or purge between shots
FAQs
Is some channeling normal?
Tiny imperfections happen even in good shops. But visible spurting, spraying, or multiple streams definitely indicate a problem worth fixing. You’re aiming for even extraction—not perfection, but not spray either.
Can my cheap grinder cause channeling?
Absolutely. Blade grinders and low-end burr grinders produce inconsistent particle sizes, which is a primary channeling cause. Upgrading your grinder is one of the biggest improvements you can make for espresso.
Is a bottomless portafilter worth buying?
100% yes. Best diagnostic tool available. Beyond diagnosis, it also motivates better puck prep—you see every flaw immediately. Hard to get lazy when you’re watching spray hit your counter.
How do I know if it’s channeling vs. under-extraction?
Use bottomless portafilter and taste together:
- Pure under-extraction: Even flow, just too fast, sour but clean taste
- Channeling: Uneven flow, spurting, sour + bitter + thin taste
Do very fresh beans cause more channeling?
Yes. Beans under 7 days post-roast are still releasing CO2 during extraction, creating bubbles and pathways. Let beans rest 7-14 days for easiest extraction.
Does pre-infusion help with channeling?
Significantly. Gentle initial wetting lets the puck saturate evenly before full pressure. If your machine has pre-infusion, definitely use it.
Key Takeaways
- Channeling = uneven extraction where water finds weak spots, mixing sour and bitter
- WDT is essential—this single technique prevents 80%+ of channeling
- Bottomless portafilter is your best diagnostic tool; get one
- Consistency wins: Same dose, same distribution, same tamp, every shot
- Troubleshoot systematically: Identify the pattern before throwing fixes at it
- Grinder quality matters: Inconsistent particles cause inconsistent extraction
Once I dialed in my WDT routine and got consistent with my workflow, channeling mostly disappeared. Shots went from lottery to craft. Worth the effort.
Related Guides:
Mikael
Home espresso enthusiast and Breville specialist. Helping you master the art of coffee brewing from your own kitchen.
Learn more about me →