Latte Art Pouring: The Monk's Head Pattern for Beginners
Learn the Monk's Head latte art pattern—the perfect starting point for beginners. Step-by-step guide to your first pour.
Everyone wants to pour a triple rosetta on day one. I did too. I wasted gallons of milk trying to wiggle the pitcher before I even knew how to pour a circle.
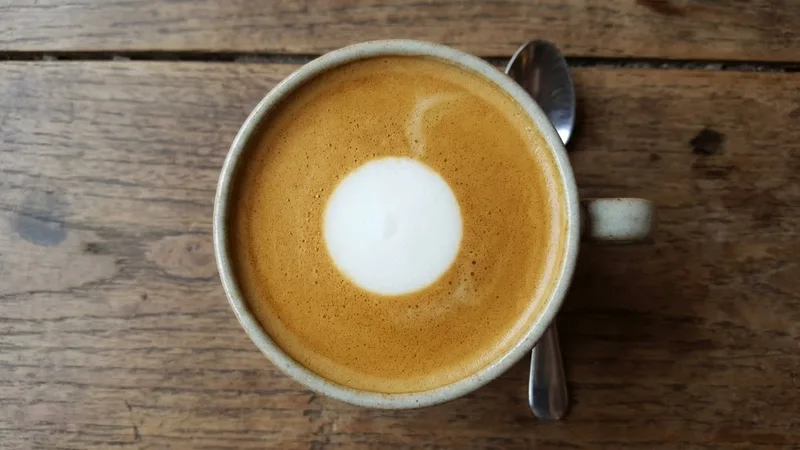
The “Monk’s Head” isn’t flashy—it’s a white dot. But it’s the foundation of everything. If you can’t pour a clean, centered dot, you definitely can’t pour a tulip. Master this first, and everything else gets easier.
What is the Monk’s Head Pattern?
It’s the simplest latte art design:
- Single white circle in center of cup
- Clean edges
- High symmetry
It teaches the fundamentals without the complex wiggles:
- Pour height (Sink vs Float)
- Flow rate (Fast vs Slow)
- Positioning (Center vs Off-center)
- Milk Texture (Paint vs Soap)
Why Start Here?
The Monk’s Head is forgiving. It teaches you how to control the milk.
| What It Teaches | Why It Matters |
|---|---|
| Pour height | The physics of latte art |
| Flow rate | Controlling pattern size |
| Cup position | Symmetry |
| Milk texture | If texture is bad, no dot forms |
Prerequisites: Before You Pour
1. Perfect Microfoam
If your milk looks like bubble bath, stop. You need glossy, wet-paint milk.
- No visible bubbles
- Shiny surface
- Swirls easily
If you have thick foam on top, it’ll just plop out in a blob. Focus on steaming first.
2. Fresh Espresso with Crema
You need a canvas.
- Good crema (brown/tan layer)
- Not too old (crema fades after a minute)
- Swirl the espresso before pouring to even it out
3. Prepared Cup
- Preheat cup (cold cups steal heat)
- Tilt cup 45 degrees toward you
- Relax your arm

Step-by-Step Monk’s Head Pour
Step 1: The High Pour (The Canvas)
Height: 4-5 inches up. Action: Pour thin stream into DEAD CENTER.
Physics: Gravity pulls the milk down through the crema. It disappears underneath. This builds volume (liquid level) without turning the top white. Goal: Fill cup about 50% full. Crema remains brown and unbroken.
Step 2: The Descent
Action: Keep pouring, but lower the pitcher smoothly. Target: Still dead center. Don’t drift.

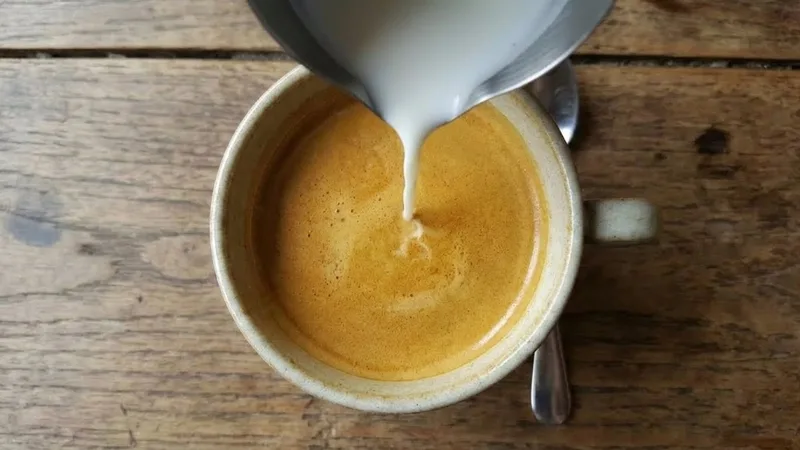
Step 3: The Low Pour (The Paint)
Height: Almost touching the liquid (0.5 inch). Action:
- Get dangerously close
- Increase flow speed slightly
- Tilt cup back to level slowly

Physics: Because you’re close, the milk flows gently onto the surface instead of diving under. It floats on the crema. Refult: A white spot appears.
Step 4: Expansion
Action: Stay low. Stay centered. Keep pouring. Result: The white spot pushes the crema outward, growing into a circle.

Control the size by how much milk you add here.
Step 5: The Cut (Optional)
- Lift pitcher high again.
- Slice forward through the circle.
- Finish.

Wait, that makes it a heart? Technically yes. A Monk’s Head with a cut-through is a heart. Without the cut, it’s an apple/monk’s head.
Common Mistakes and Fixes
Circle Off-Center
Cause: You felt centered, but your pitcher was drifting right. Fix: Look at the cup handle. Align your pitcher spout with the handle axis.
Fuzzy / Blurry Edges
Cause: Milk too thick (cappuccino foam) OR you poured from too high while trying to make the dot. Fix: Thinner milk texture. Get closer.
No White Dot appearing
Cause: You’re too high. Gravity is diving the milk under. Fix: Get lower. Tip of spout inside the cup.
Dot Sinks Immediately
Cause: Milk too thin (watery) or poured too slow. Fix: Stretch milk slightly more. Pour with confidence, not a trickle.
The “Onion” Shape
Cause: Wobbly hand. Fix: Use two hands to hold pitcher for stability.
Practice Drills (Cheater Edition)
Don’t waste coffee. Drill 1: The Water Drop Pour water into a cup. Practice the high-to-low motion. Listen to the sound change (splash vs silent).
Drill 2: Soap Art Add a drop of dish soap to water. Froth it (it acts like milk). Pour into a cup of water with soy sauce (fake espresso). It works surprisingly well for practicing flow dynamics.
Progressing Beyond Monk’s Head
Once you nail the dot consistently:
Next: Heart Monk’s Head + slight wiggle + cut through.
Then: Tulip Pour Monk’s Head -> Stop -> Push back -> Pour another -> repeat.
Then: Rosetta Wiggle wiggle wiggle while pulling back.
Frequently Asked Questions
How low is “low”?
Spout should be inside the rim of the cup. If you aren’t scared of dipping the spout in the coffee, you aren’t close enough.
Why Monk’s Head?
It builds muscle memory for “High-Low” transition. That transition is the secret to all latte art.
Fast or slow pour?
High phase: Medium speed (pencil thin stream). Low phase: Faster speed (rat tail thickness). Too slow = sinks. Too fast = washes out.
Crisp edges?
Comes from good milk texture. If your milk is good, the contrast happens automatically.
Related Guides:
Mikael
Home espresso enthusiast and Breville specialist. Helping you master the art of coffee brewing from your own kitchen.
Learn more about me →