Espresso Puck Prep: Complete Distribution & Prep Routine
Master puck preparation with WDT, distribution, and tamping workflow. Step-by-step routine for consistent espresso extraction on Breville.
There’s a reason why some home baristas pull consistently good shots while others get random results. It’s not the beans, it’s not the machine—it’s puck prep. After years of mediocre espresso, I finally nailed down a 60-second routine that gives me predictable shots every single time.
If you’re getting channeling, uneven extractions, or shots that taste different every morning despite using the same grind setting—your puck prep is probably the problem. Let me share what works on my Breville Barista Express.
Why Puck Prep Matters
Your espresso puck is essentially a filter. Water needs to flow through it evenly to extract all the good flavors. Any gaps, clumps, or uneven density creates weak spots where water rushes through—this is called channeling.
What Happens Without Proper Prep
| Poor Prep | Result |
|---|---|
| Clumpy grounds | Water bypasses clumps → sour spots |
| Uneven distribution | One side extracts more → mixed flavors |
| Crooked tamp | Fast flow on one side → inconsistent shots |
| Air pockets | Instant channels → gushing extraction |
The SCA recommends even extraction across the entire puck surface—and that only happens with consistent prep.
The Complete Puck Prep Workflow
Here’s my exact routine, step by step:
Step 1: Dose Precisely (10 seconds)
- Place your portafilter on a scale
- Tare to zero
- Grind directly into the basket
- Target exactly 18.0g for double basket (±0.2g)
- If over-dosed, remove excess with a spoon—never tap it out
Pro tip: I grind into a dosing cup first, then transfer. This lets me see exactly what I’m working with before it hits the basket.
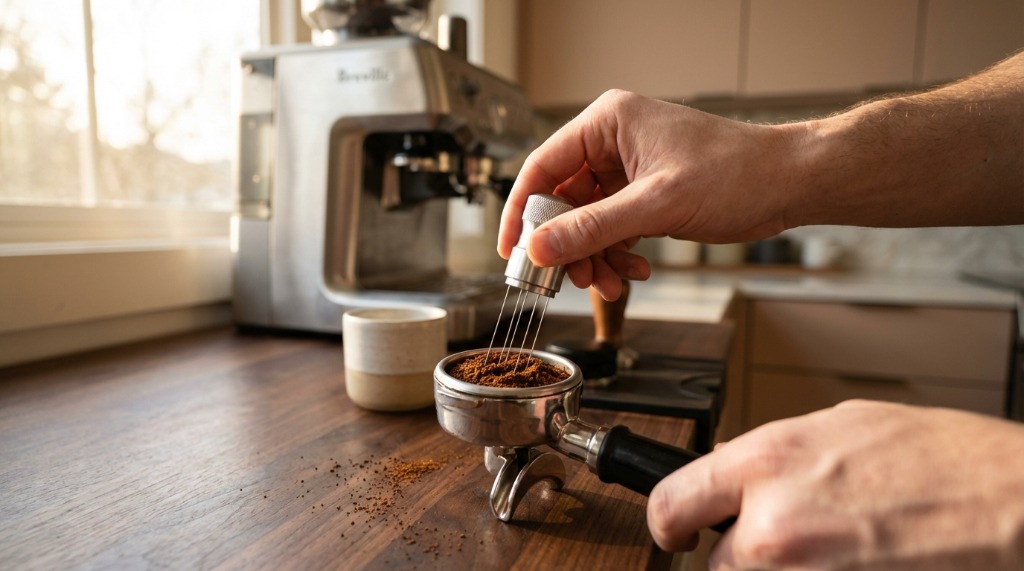
Step 2: WDT Distribution (15 seconds)

WDT stands for Weiss Distribution Technique—basically stirring the grounds with thin needles to break up clumps.
What you need:
- WDT tool with 0.3-0.4mm needles (or 3D printed, or paperclips)
- A dosing funnel helps contain the mess
How to do it:
- Insert needles deep into the grounds
- Stir in a circular motion from bottom to top
- Work from center outward
- 10-15 quick circular passes
- The surface should look fluffy and evenly distributed
Why this works: Coffee comes out of the grinder in clumps—especially on Breville’s built-in grinder. WDT breaks these apart before water has a chance to find them.
Step 3: Level Distribution (10 seconds)

After WDT, the grounds are fluffy but maybe not perfectly level. Use your finger or a distribution tool:
Finger method (free):
- Use the side of your finger (not fingertip)
- Sweep across the surface in an X pattern
- Push excess from high spots to low spots
- Final surface should be relatively flat
Distribution tool method:
- Set depth so tool sits just above basket rim
- Spin 2-3 rotations
- Tool levels and evenly spreads the grounds
- Consistent depth every time
Step 4: Settle the Grounds (5 seconds)
Before tamping, give the portafilter a few light taps on the counter. This settles the grounds and removes large air gaps.
Important: Gentle taps only—3-4 at most. Hard tapping creates channeling-prone layers.
Step 5: Tamp (10 seconds)

Now you create the final resistance layer:
- Position: Keep portafilter on a level surface or use a tamping stand
- Pressure: Apply firm, consistent pressure—about 30 lbs (15 kg)
- Level: Use your eyes or a calibrated tamper to ensure perfectly flat
- Polish: Light twist at the end to seal the surface
Common mistakes:
- Pressing too hard (more pressure doesn’t help after 20 lbs)
- Tilting the tamper (creates weak spots)
- Tapping the side of the portafilter (cracks the puck edge)
Step 6: Clean and Lock (10 seconds)
- Wipe loose grounds from the basket rim with your finger
- Check for grounds on the portafilter ears
- Lock into the group head immediately—don’t let it sit
- Start extraction within 5 seconds
My Actual Morning Routine

Here’s what 60 seconds looks like in practice:
| Step | Time | Action |
|---|---|---|
| 0:00 | Dose | Grind 18g into portafilter |
| 0:10 | WDT | Break clumps with needle tool |
| 0:25 | Level | Distribution tool or finger sweep |
| 0:35 | Settle | 3-4 light taps |
| 0:40 | Tamp | Firm, level, polish twist |
| 0:50 | Clean | Wipe rim, check ears |
| 0:55 | Lock | Portafilter into group head |
| 0:60 | Extract | Hit brew button |
Equipment You’ll Need
Essential (start here)
| Tool | Purpose | Cost |
|---|---|---|
| Digital scale | Precise dosing every time | $15-30 |
| Dosing funnel | Contains mess during WDT | $8-15 |
| Basic WDT tool | Breaks up clumps | $5-15 |
Nice to Have
| Tool | Purpose | Cost |
|---|---|---|
| Calibrated tamper | Consistent 30 lb pressure | $30-50 |
| Distribution tool | Perfect leveling | $20-40 |
| Dosing cup | Grind, shake, transfer | $10-20 |
DIY Options
Don’t want to spend money yet? I started with:
- WDT: 3-4 paper clips in a wine cork
- Leveling: Side of my index finger
- Funnel: Cut the bottom off a yogurt cup
These worked fine until I decided to upgrade.
Troubleshooting Common Issues
Still Getting Channeling
If you’re doing everything right but still see spurts:
- Grind finer: Coarser grounds are harder to prep properly
- Check your WDT depth: Get the needles all the way to the bottom
- Distribution tool too aggressive: It can create its own uneven layers
- Tamp pressure inconsistent: Focus on level over pressure
Soupy Puck After Extraction
Your puck should pop out as a firm disk. If it’s soup:
- Dose might be too low—increase to 19-20g
- Try skipping the settle taps—they might be compacting too much
- Basket might have too much headspace
Shots Running Too Fast Despite Good Prep
If prep is solid but extraction is still fast:
- Grind needs to be finer (always start here)
- Beans might be too old—check roast date
- Check if basket is single-wall or double-wall
The Difference Good Prep Makes

I tracked my shots for two weeks—one week with my old careless prep, one week with this routine:
| Metric | Careless Prep | Proper Routine |
|---|---|---|
| Extraction time variance | ±8 seconds | ±2 seconds |
| Visible channeling | 4/7 shots | 0/7 shots |
| ”Good” shots (my rating) | 3/7 | 6/7 |
| Wasted beans adjusting | ~40g/week | ~10g/week |
Consistency doesn’t mean every shot is perfect—it means you can actually fix problems because you’ve eliminated prep as a variable.
FAQs
Is WDT really necessary on Breville?
Yes, especially with the built-in grinder. The Breville grinder produces more clumps than standalone grinders. WDT is the single biggest improvement I made to my workflow.
How long should puck prep take?
Under 60 seconds once you get the hang of it. My first attempts took 2+ minutes. Now it’s automatic—I don’t even think about it.
Can I skip the distribution tool?
Absolutely. The finger sweep method works fine. Distribution tools just add consistency and speed. I went 6 months without one.
What WDT needle thickness is best?
0.3-0.4mm is ideal. Thicker needles (like toothpicks) push grounds around instead of separating them. Finer than 0.3mm can be too fragile.
Does puck prep matter with pressurized (double-wall) baskets?
Much less. Pressurized baskets artificially create resistance regardless of puck quality. But if you’re using single-wall baskets (recommended), prep is critical.
Key Takeaways
- Puck prep is the most underrated espresso skill—it’s free and makes immediate difference
- WDT eliminates clumps—this alone fixes most channeling issues
- Consistent routine = consistent shots—remove variables so you can diagnose actual problems
- You don’t need expensive tools—DIY works fine while learning
- 60 seconds is all it takes—faster than searching for why your last shot sucked
Start with WDT and a level tamp. Add tools as you refine your process. Your shots will thank you.
Related Guides:
Mikael
Home espresso enthusiast and Breville specialist. Helping you master the art of coffee brewing from your own kitchen.
Learn more about me →