Grinder Deep Clean: Removing the Upper & Lower Burrs
How to deep clean Breville grinder burrs for optimal performance. Step-by-step guide to remove, clean, and reassemble conical burrs.
Switched from a dark Sumatran to a light Ethiopian last month and could not figure out why my shots tasted muddy. Same beans, same grind setting, same everything. Then I popped off the upper burr and—yeah. Caked with old dark roast oils. Problem solved in 15 minutes.
Your Breville grinder needs deep cleaning more often than you probably think. Those oils and fine particles from previous brews don’t just disappear. They hang out in the burrs, mixing with whatever you grind next and messing with your flavor in ways you might not even notice until you clean it.
Whether you’re switching bean varieties or your grinds just seem… off lately, a proper deep clean—actually pulling out those upper and lower burrs and scrubbing them—clears out the stuff that daily wiping never touches. Let’s do this.
Why Grinder Cleaning Matters
The grinder is genuinely the most important part of any home espresso setup. Breville’s integrated grinders on the Smart Grinder Pro and Barista Express are solid, but neglecting cleanup catches up with you.
Flavor Contamination
Old coffee oils oxidize and go stale. When they coat your burrs, every new batch of beans picks up some of that staleness. It’s especially obvious when:
- You go from dark roast to light roast (dark roast oils are persistent)
- You grind flavored coffee, then try to use regular beans (that hazelnut smell lingers forever)
- You use the grinder for both espresso and pour-over with different beans
I learned this switching from a chocolatey Brazilian to a fruity Kenyan. Took three deep cleans over two weeks to fully get rid of the chocolate notes contaminating my light roast shots.
Performance Issues
As residue builds up, things start going wrong:
- Grinder sounds labored—the motor’s fighting against gunk buildup
- Particle sizes get weird—coarser on the edges, finer in the middle
- Espresso channels—from uneven particle distribution
- Crema disappears—extraction quality tanks
Extended Lifespan
Regular cleaning isn’t just about taste. You’re also:
- Keeping the motor from straining
- Reducing wear on the drive gears
- Adding years to your grinder’s useful life
- Maintaining the grind consistency you paid for
Tools You’ll Need
Grab these before you start:
Essential Tools
- Breville cleaning brush—came with your machine, hopefully you didn’t lose it
- Soft, dry cloth—microfiber works great
- Small vacuum or hand vac—optional but makes life easier
- Toothpick or wooden skewer—for getting into tight spots
Optional Tools
- Compressed air can—blasts loose particles out nicely
- Grindz cleaning tablets—for maintenance between deep cleans
- Small flashlight—helps you see what you’re doing in there
- Soft toothbrush—good for detailed work
What NOT to Use
- ❌ Water anywhere near the burrs (steel + water = rust)
- ❌ Dish soap or any cleaning products
- ❌ Abrasive pads or scrubbers
- ❌ Dishwasher for anything except maybe the hopper (and even then I don’t recommend it)
Preparation Steps
Before you start pulling things apart:
- Unplug the machine—not optional
- Empty that hopper—pour every bean into an airtight container
- Run the grinder empty—clear whatever’s left in the chute
- Lift off the hopper—unlock and remove
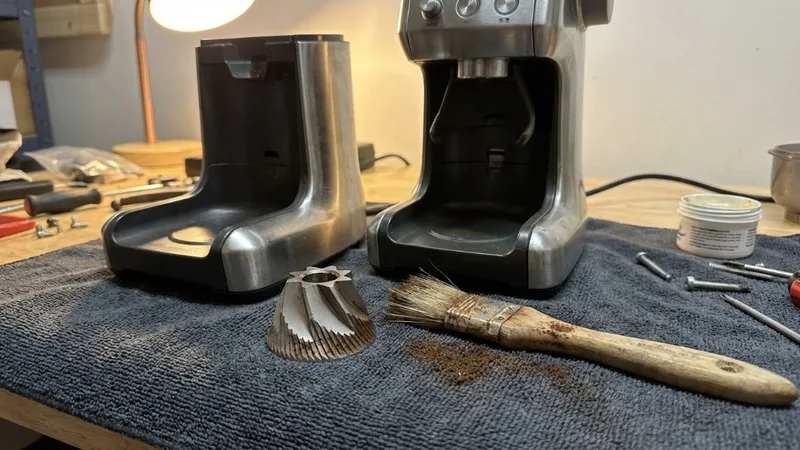
Removing the Upper Burr
The upper burr comes out for cleaning. This is where most of the buildup lives.
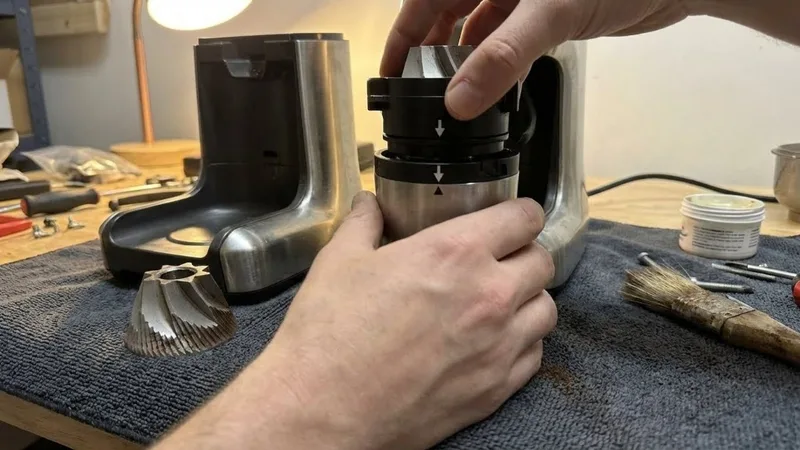
Step 1: Locate the Upper Burr Assembly
With the hopper off, look down into the grinder. You’ll see the upper burr sitting there with an arrow and “remove” marking on it.
Step 2: Rotate Counter-Clockwise
- Get a solid grip on the burr itself
- Twist counter-clockwise—follow that arrow
- Rotate until it hits the “remove” position
- Should feel it unlock with a slight give
Step 3: Lift Out the Burr
- Pull straight up—firm but not aggressive
- First time removing might be snug—that’s normal
- Don’t pry or lever it out. Should come clean with just pulling
- Set it down on a clean cloth
If it’s stuck: Run a few more beans through, try again. The grinding loosens things up.
Cleaning the Upper Burr
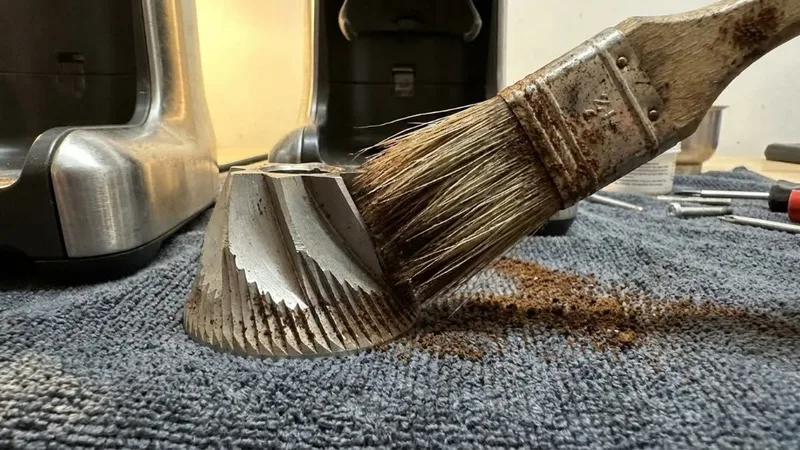
Now the satisfying part. You’ll be amazed how much is hiding in there.
Step 1: Brush the Burr Teeth
- Grab that Breville brush
- Work between each tooth and groove—there are more than you think
- Circular motions work best
- Get all the visible grounds out
Step 2: Clean the Top and Bottom
- Brush the flat surfaces on both sides
- The center hole collects a lot—pay attention there
- Compacted grounds in crevices need a toothpick
- Keep at it until nothing else comes out
Step 3: Wipe with Dry Cloth
- Wipe down every surface
- You’re removing the oily residue the brush leaves behind
- No water—I cannot stress this enough
- Make sure it’s completely clean and dry before putting it back
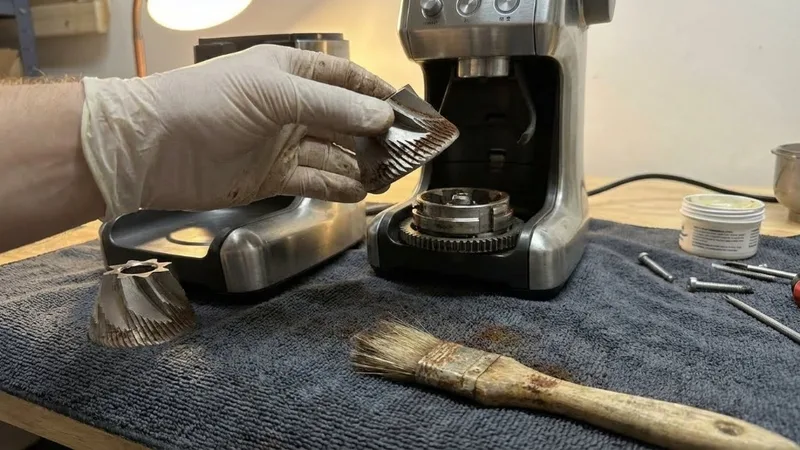
Cleaning the Lower Burr
Most Breville models don’t let you remove the lower burr—it’s precision-mounted and they don’t want you messing with it. But you can still get it clean.
Step 1: Clear Visible Grounds
- Brush around the whole thing
- Work your way around the entire circumference
- The center area tends to accumulate more
Step 2: Use Vacuum
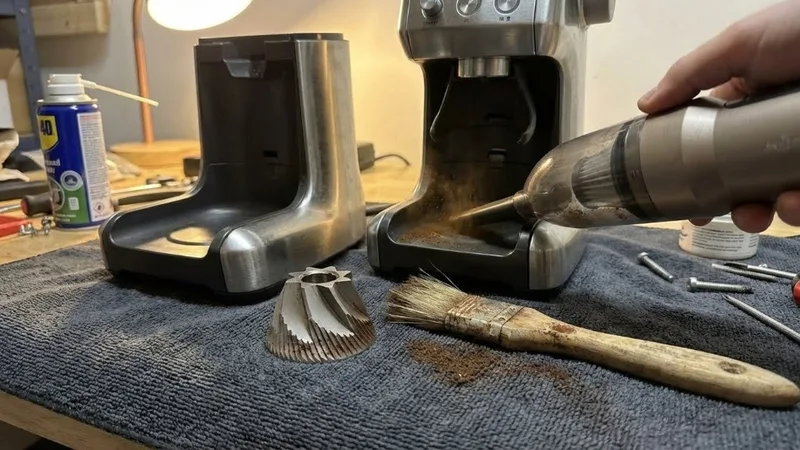
- Vacuum inside the lower burr chamber carefully
- Gets the fine stuff your brush missed
- Keep the vacuum nozzle away from actually touching the burr
Step 3: Brush Between Teeth
- Carefully work the brush into the lower burr teeth
- Same circular motions as the upper
- A flashlight really helps here—otherwise you’re working blind
Go easy—the lower burr is mounted precisely and you don’t want to knock anything out of alignment.
Cleaning the Grind Chute
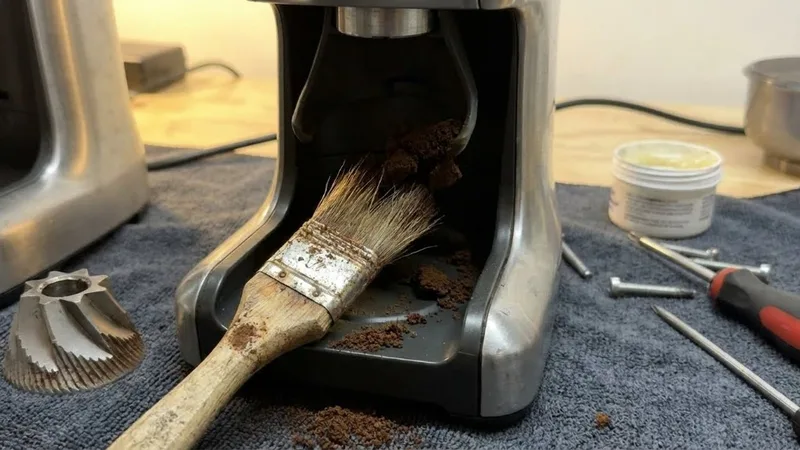
The chute from burrs to portafilter holder gets packed with compacted grounds over time. Don’t skip this.
Step 1: Locate the Chute
It runs from the burr chamber down to where your grounds come out. You’ve probably seen buildup there already.
Step 2: Brush Inside
- Jam that brush up into the chute
- Scrub up and down
- You’re dislodging the compacted stuff that’s been sitting there for months
- Come at it from different angles
Step 3: Vacuum Loose Grounds
- Vacuum whatever you loosened
- Make sure there’s no blockage left
- Clear pathway = consistent dosing
Step 4: Clean the Exit
- Brush around where grounds actually dispense
- Gunk collects around the rim
- Wipe the exterior with your dry cloth
Reassembly
Time to put it all back together.
Step 1: Insert Upper Burr
- Line up the burr with the mounting posts—there’s only one correct orientation
- Drop it in so it sits flush
- Rotate clockwise until you hit the lock position
- Should click into place
Step 2: Replace Hopper
- Position the hopper over the opening
- Press down gently
- Twist clockwise to lock
- Give it a little tug to confirm it’s secure
Step 3: Test Grind
- Drop in about 10g of beans
- Run the grinder
- Throw away these first grounds—they’ll have cleaning residue
- Check that everything sounds and feels normal
Cleaning the Hopper and Lid
While you’ve got everything apart, might as well do the hopper too.
Step 1: Empty Completely
Seriously, every last bean. Check corners. They hide.
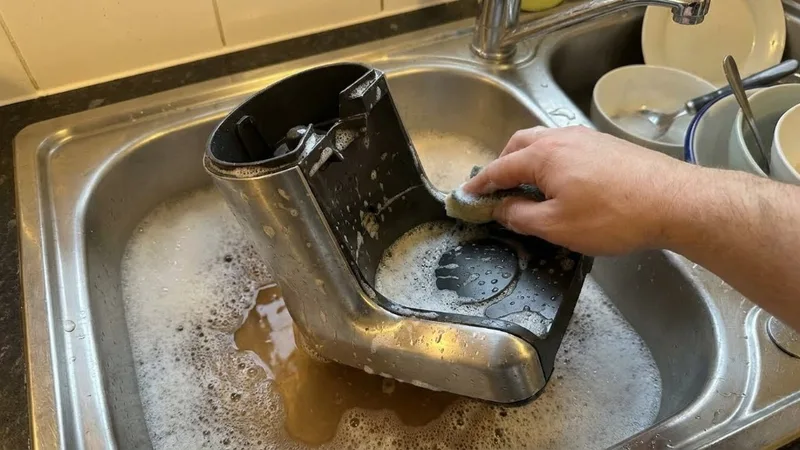
Step 2: Wash with Warm Water
The hopper and lid are the only parts that can get wet:
- Warm water and a drop of dish soap
- Soft sponge—nothing abrasive
- Rinse really thoroughly
- Dry completely—this matters a lot
Step 3: Check for Residue
- Look for any oily film left behind
- Scrub stubborn spots
- Should look crystal clear when done
Critical: That hopper needs to be 100% dry before reinstalling. Moisture in the grinder means rust and mold. Neither is good.
Cleaning Frequency Recommendations
How often you need to deep clean depends on how much you grind:
| Usage Level | Deep Clean Frequency |
|---|---|
| Light (1-2 shots/day) | Every 2-3 months |
| Medium (3-5 shots/day) | Monthly |
| Heavy (6+ shots/day) | Every 2-3 weeks |
| When changing bean types | Every single time |
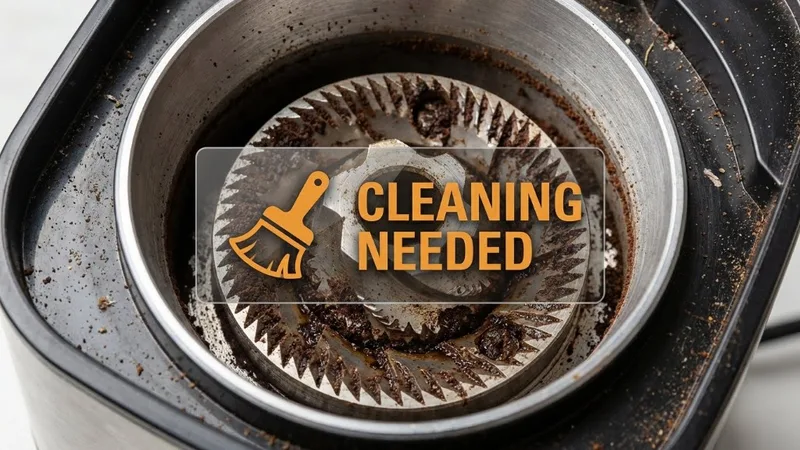
Signs It’s Time to Clean
- Grinds look inconsistent—some fine, some coarse
- Grinding sounds slower or more strained than usual
- You taste yesterday’s beans in today’s shot
- Visible buildup when you look inside
- Beans getting stuck or feeding unevenly
Common Mistakes to Avoid
Things I either did myself or watched others do:
Don’t Use Water on Burrs
Steel burrs rust. Period. Dry cleaning only—brushes and cloths. I ruined a burr set on an old Rancilio this way before I knew better.
Don’t Force the Upper Burr
If it won’t budge, purge more grounds and try again. Forcing it strips the threads. Ask me how I know.
Don’t Use Abrasive Cleaners
Any scratches on the burr surface affect grind quality. Stick to soft brushes and microfiber.
Don’t Skip Drying Time
Moisture anywhere in the assembly leads to rust. Let washable parts air dry completely—even longer than you think necessary.
Don’t Overtighten
When locking the burr or hopper back in, snug is enough. Cranking down on it damages threads and seals.
Don’t Dishwasher Parts
Even the hopper shouldn’t go in the dishwasher. The heat warps the plastic, and then it doesn’t seat right anymore.
Using Grinder Cleaning Tablets

For quick maintenance between full deep cleans, Grindz tablets work well:
How to Use
- Empty every bean from the hopper
- Pour in one capful of Grindz
- Let it grind through completely
- Add a small amount of regular coffee beans
- Grind those through to clear any Grindz residue
- Discard everything—don’t drink any of this
How often: Monthly between deep cleans keeps things fresher.
Reality check: Tablets don’t replace actually removing and cleaning the burrs. They buy you time between full disassembly, but they’re not a substitute.
Model-Specific Notes
Breville Barista Express (BES870/BES875)
- Upper burr might be really stiff the first time you remove it—don’t panic
- Process is identical to standalone grinders
- Espresso use = clean more often than filter coffee use
Smart Grinder Pro
- Hopper lock mechanism is slightly different—check your model
- Burr removal works the same way
- LCD display has nothing to do with cleaning
Dose Control Pro
- Similar process to Smart Grinder
- Grab your manual if anything feels different
FAQs
How often should I deep clean my Breville grinder?
Depends on use—anywhere from monthly to every 2-3 months. If you’re pulling 5+ shots daily, monthly is smart. Always deep clean when switching bean types, especially going from dark to light roast.
Can I put Breville burrs in the dishwasher?
Absolutely not. You’ll ruin them. Hand clean with dry brushing only. No water, no soap, no dishwasher.
What if the upper burr won’t come out?
Run the grinder empty for a few more seconds to loosen any stuck grounds. Then give the counter-clockwise rotation another firm try. It should not require tools—if you’re reaching for pliers, something’s wrong.
Do I need a vacuum for cleaning?
Helpful but not critical. A good brush gets most of the debris. Vacuum catches the fine particles that brushes miss, especially in hard-to-reach spots.
Will cleaning affect my grind settings?
Sometimes you need to recalibrate by one click after reassembly. Pull a test shot and adjust as needed—shouldn’t be a major difference.
Key Takeaways
- Actually remove the upper burr—weekly hopper wipes don’t cut it
- Brush between every tooth—that’s where the buildup hides
- Never get the burrs wet—dry cleaning only
- Dry the hopper completely—moisture causes rust and mold
- Clean monthly for espresso—or any time you switch beans
- Discard those first grinds after reassembly—residue is real
- Consistent maintenance adds years to your grinder and keeps coffee tasting right
Takes maybe 15-20 minutes once you’ve done it a couple times. Totally worth it for the flavor improvement. Your future shots will taste noticeably cleaner.
Related Guides:
Mikael
Home espresso enthusiast and Breville specialist. Helping you master the art of coffee brewing from your own kitchen.
Learn more about me →