Fix Breville Grinder Not Grinding
Targeted solutions for built-in grinder failures in Breville machines. Fix clicking sounds, inconsistent dosing, and burr jams without professional repair.
There is nothing more frustrating than waking up for your morning coffee, pressing the portafilter into the cradle, and hearing… click, click, click—or worse, complete silence. Your heart sinks. Is the grinder dead? Did you break something?
The built-in grinders on the Barista Express, Pro, and Touch are super convenient, but they’re prone to jamming if you skip maintenance or if a stray pebble sneaks into your beans. Before you box up your machine to send it for repair, know this: about 90% of grinder issues can be fixed at home in under 15 minutes.
I’ve dealt with jammed grinders more times than I’d like to admit. Once it was a twig (from some farm-fresh single origin). Once it was a tiny stone. Once it was literally just old, oily coffee that had turned into cement. This guide covers everything from quick fixes to deep troubleshooting, based on real experience with these machines.
Understanding How the Grinder Works
Before we get into fixes, it helps to understand the basic mechanism.
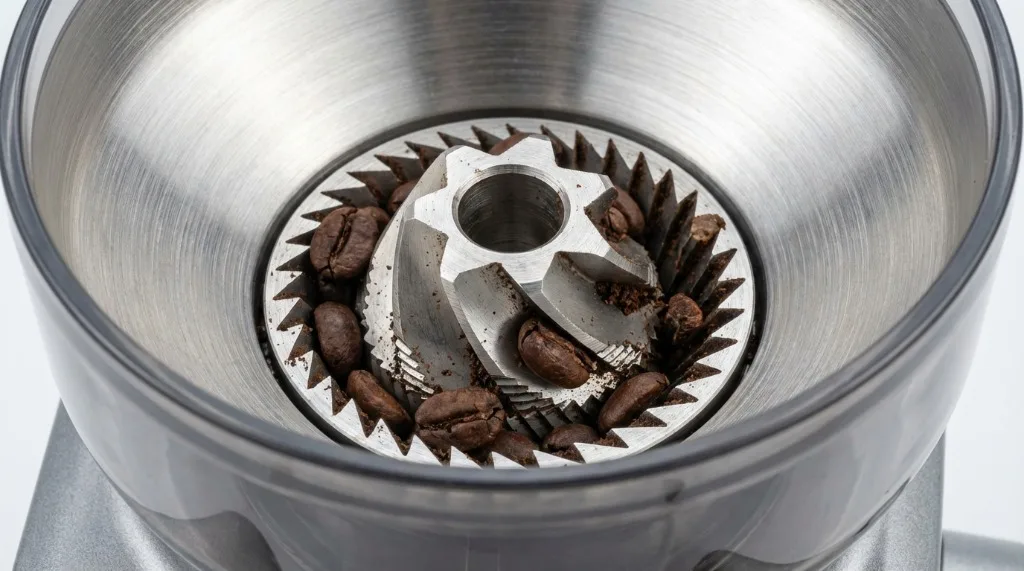
Breville’s built-in grinders use conical steel burrs. The outer burr is fixed; the inner burr spins. Beans drop between them and get crushed. The grounds fall through a chute into your portafilter.
The system has three potential failure points:
- The burrs — Can jam if something hard (like a stone or unroasted green bean) gets stuck between them.
- The chute — Can clog with oily or static-charged coffee that clumps together.
- The motor/clutch — Produces that click, click, click sound when overloaded rather than burning out.
That clicking sound is actually a safety feature. The clutch slips intentionally to protect the motor. It’s the machine saying “something is stuck, help me.”
Common Grinder Symptoms
Let’s identify what you’re dealing with:
Loud Clicking or Ratcheting Sound
- What’s happening: The motor is spinning, but the clutch mechanism is slipping because the burrs are jammed.
- Severity: Low. This is almost always fixable with a deep clean.
- Common cause: Stone, twig, or hard unroasted bean fragment stuck between burrs.
Motor Hums But No Movement
- What’s happening: The burrs are completely seized. The motor is trying but can’t budge.
- Severity: Medium. Stop immediately—don’t keep pressing the button or you risk motor burnout.
- Common cause: Large foreign object or severely impacted coffee buildup.
Inconsistent Dose Amounts
- What’s happening: You set the grinder to 18g, but you get 12g one day and 22g the next.
- Severity: Low to medium. Usually a calibration or clog issue.
- Common cause: Partial chute blockage, worn dose adjustment mechanism, or ground retention buildup.
Grinder Runs But No Output
- What’s happening: The motor sounds normal, but nothing appears in the portafilter.
- Severity: Medium. Almost certainly a chute clog.
- Common cause: Oily dark roast beans have clumped up and completely blocked the exit chute.
Complete Silence
- What’s happening: Pressing the grind button produces zero sound.
- Severity: High. This is likely an electrical issue.
- Common cause: Safety interlock not engaged (hopper not seated properly), or internal fuse/motor failure.
Quick Fixes to Try First
Before taking anything apart, try these simple checks. They solve the problem about 60% of the time.
Check 1: The Hopper Gate
Did you recently remove the hopper to refill beans? Breville grinders have a safety interlock—if the hopper isn’t locked, the grinder won’t start.
- Make sure the locking knob on top of the hopper is turned fully to “Lock” (you should feel it click)
- Try pressing the grind button again
This catches me every single time I clean the hopper. It’s embarrassingly simple but happens to everyone.
Check 2: Verify Grind Size
If you’re dialed into the finest setting (1 or “Fine”), the burrs might be touching or clogged with oil.
- Dial it back to Coarse (15-20)
- Try running the grinder with no beans
- If it runs freely, the issue was over-fine settings combined with oily residue
Check 3: The Vacuum Trick
This is my go-to quick fix for clicking sounds.
- Remove the hopper
- Use a vacuum cleaner hose directly on the bean intake opening
- While vacuuming, pulse the grinder button on and off
- The suction often pulls out whatever fragment is causing the jam
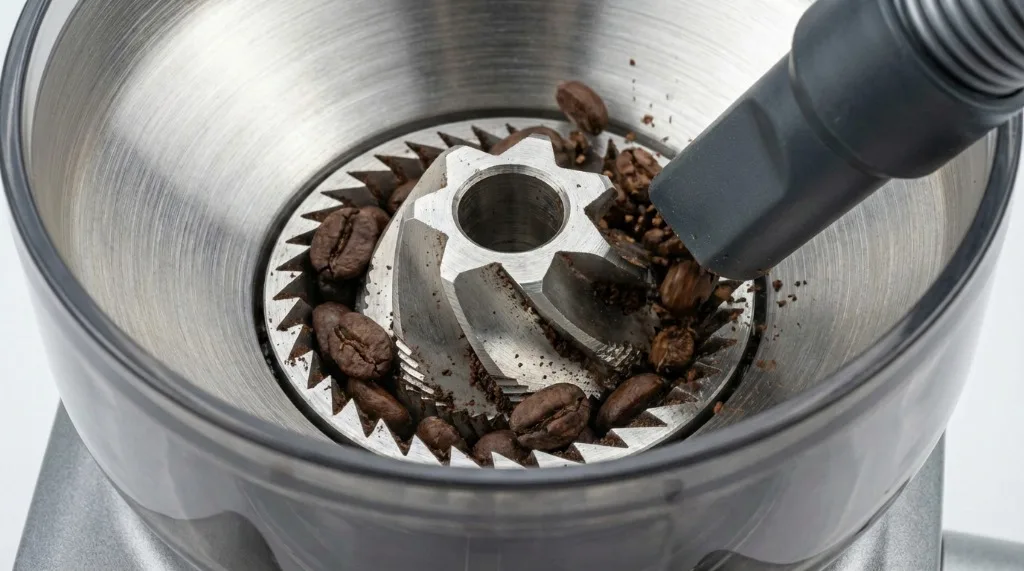
I’ve retrieved pebbles, twigs (yes, from farm-fresh beans), and broken bean shards this way. It’s surprisingly effective.
Check 4: Purge with Coarse Beans
Sometimes the grinder just needs to push past a blockage.
- Set the grind to the coarsest setting
- Add a small handful of beans
- Run the grinder
- The coarse grind setting creates more space between the burrs, allowing jammed material to escape
Deep Troubleshooting: Step-by-Step
If the quick fixes didn’t work, you’ve got a jam in the burr chamber. Time to open it up.
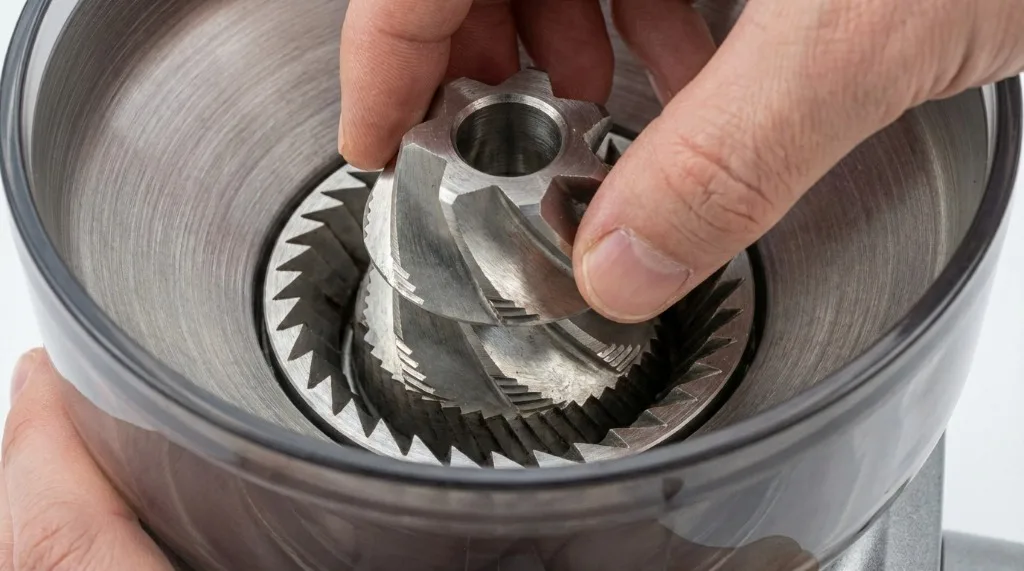
Step 1: Remove the Top Burr
This is non-destructive and doesn’t void any warranty.
- Unlock and remove the bean hopper
- Locate the wire handle on the top burr (it sits in the center of the grinder)
- Lift the handle and twist counter-clockwise about ¼ turn
- Pull the top burr straight up and out
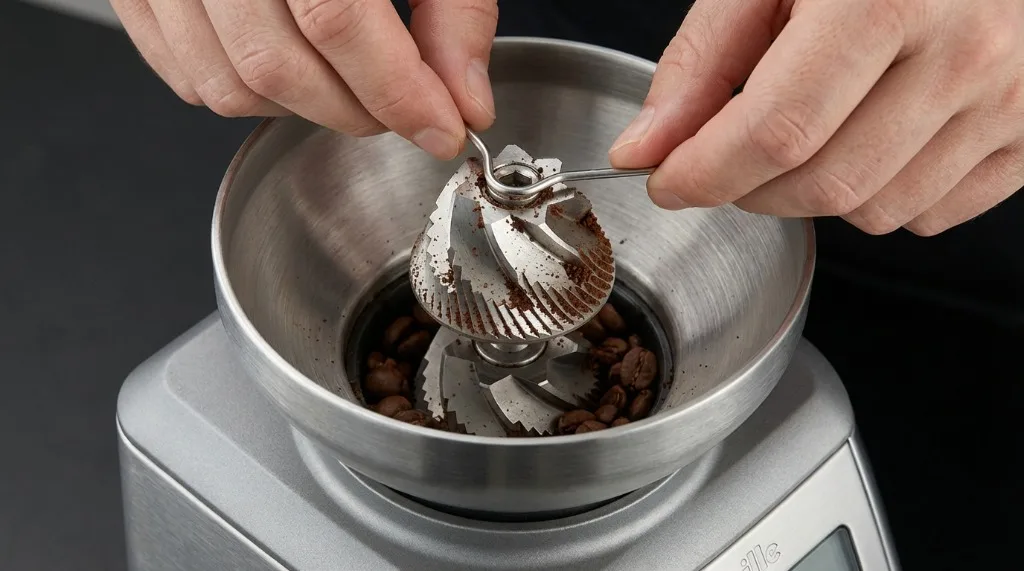
Inspect it carefully:
- Is there a stone or unroasted “green” bean stuck in the teeth?
- Are the burr teeth coated with coffee oil (brown, sticky residue)?
- Is anything cracked or broken?
Use a stiff brush to clean the burr teeth. I use an old toothbrush—works perfectly.
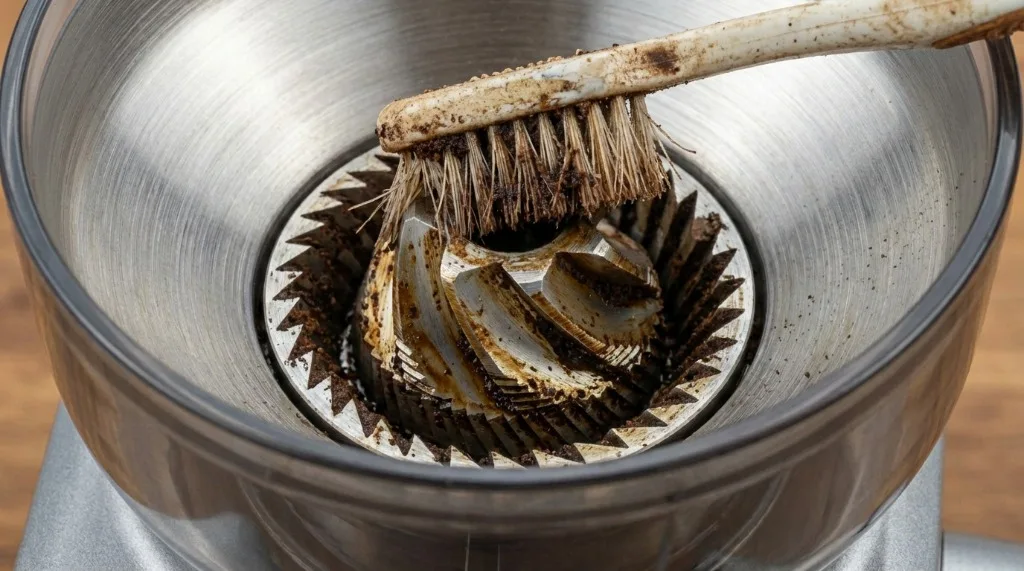
Step 2: Clean the Lower Burr Chamber
You can’t easily remove the bottom burr (it’s bolted in), but you can clean around it.
- Use the stiff brush tool that came with your machine (or just a vacuum)
- Look inside the opening where the top burr was. You’ll see the bottom burr and the “impeller” area below it.
- The Impeller Jam: Look closely at the metal “fan” blades below the bottom burr. This is where compressed coffee dust builds up like concrete over time. Use a toothpick, wooden skewer, or stiff wire to scrape this area clean.
- Vacuum out all the debris you’ve loosened.
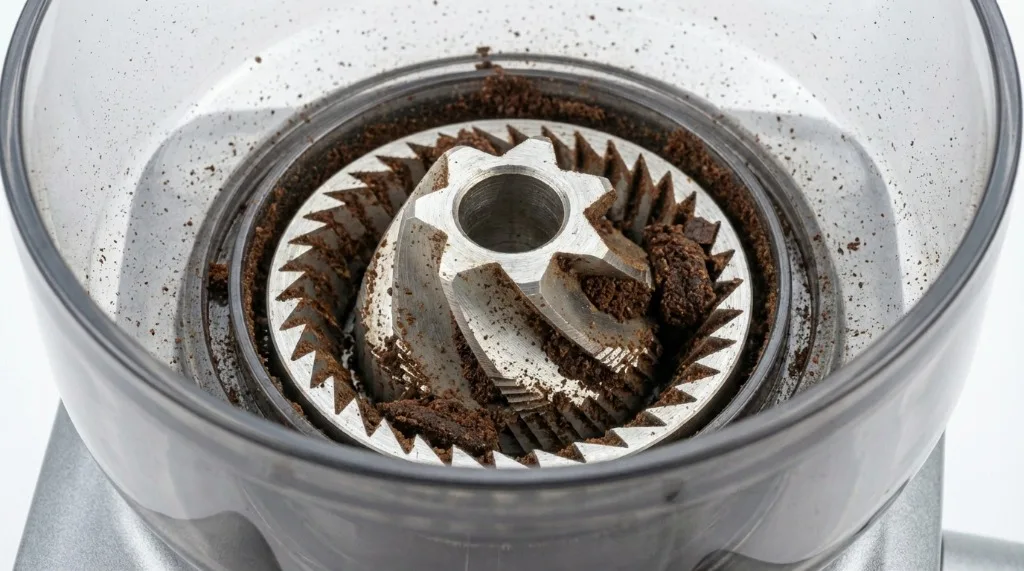
This impeller area is the #1 cause of jams in my experience. Home baristas call it “puck concrete.”
Step 3: Clear the Exit Chute
The chute leading to the portafilter often gets clogged with oily dark roasts.
- Look at the exit where coffee drops into the portafilter
- Use a pipe cleaner, thin brush, or flexible wire to poke up into the chute from below
- Work it around to dislodge any compressed coffee
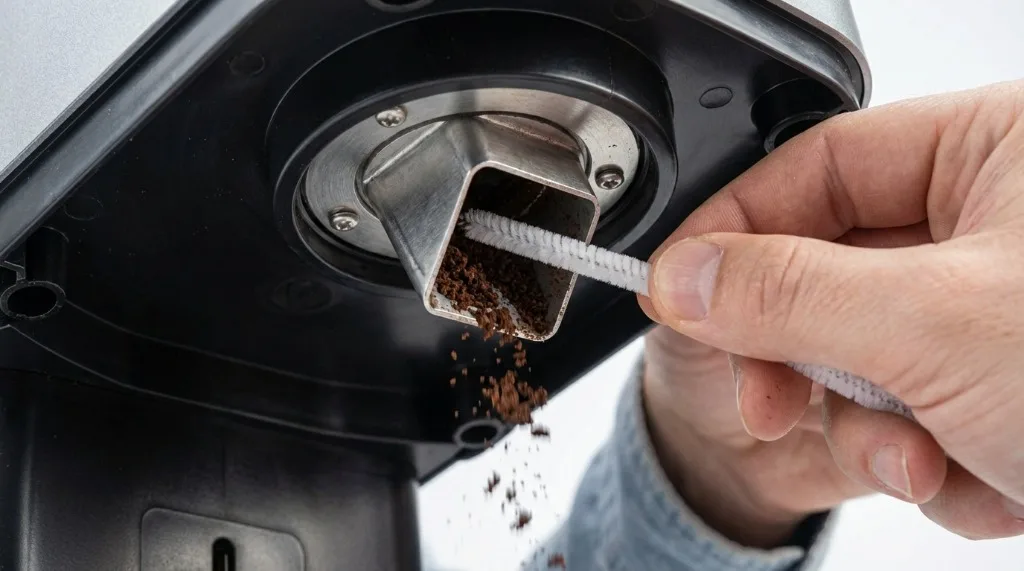 4. You may need to break up a “plug” of compacted grounds—it can be surprisingly hard
Pro tip: After clearing the chute, run the grinder on the coarsest setting for 5 seconds to push fresh grounds through and confirm the path is clear.
Step 4: Reassemble and Test
- Replace the top burr (align it, then twist clockwise until it locks)
- Replace the hopper and lock it
 3. Set to a medium grind setting (around 10)
4. Add a few beans and test
3. Set to a medium grind setting (around 10)
4. Add a few beans and test
If the clicking is gone and grounds appear, you’ve fixed it. High five!
Model-Specific Solutions
Barista Express (BES870)
Dose Timer Light Flashing: This often means the hopper isn’t locked OR the machine detected an irregular grind cycle (jam).
- Solution: Unlock hopper, reseat it, lock firmly.
Thermal Reset: If the motor overheated (from a severe jam), the internal thermal switch may have tripped.
- Solution: Unplug the machine for 20-30 minutes. The thermal switch resets when cool.
Upper Burr Carrier: On older units, the plastic ring that holds the upper burr can crack. If the burr wobbles or won’t lock properly, inspect this white plastic collar carefully.
Barista Pro and Barista Touch
These use a newer burr system (Etzinger-style conical burrs).
High-Pitched Whine: If you hear a high-pitched whine instead of normal grinding, the upper burr carrier might be cracked.
- Inspect the white plastic collar on the removable burr. If it’s broken, it needs replacement (~$30 part from Breville).
TFT Display Errors: The Barista Touch may show error messages.
- “Grind” errors usually mean a jam. Follow the deep cleaning steps above.
- “ERR” codes may require a factory reset (check your manual for the button combination).
Smart Grinder Pro
Error “ERR”: This indicates a motor stall.
- Immediate action: Stop grinding. Follow the deep cleaning steps above.
- If ERR persists after cleaning, the motor may be faulty (rare).
Dose Inconsistency: The Smart Grinder Pro uses time-based dosing. If doses are wildly inconsistent:
- Clean the chute (retention varies a lot when it’s clogged).
- Recalibrate start weight (the grinder has a calibration mode—see manual).
Prevention: How to Avoid Future Jams
Use Quality Beans
Cheap commodity coffee often contains foreign objects—stones, twigs, and green beans that escaped screening. These are the main cause of jams.
Premium specialty coffee goes through more rigorous sorting. The extra cost pays for itself in fewer jams and better espresso.
Avoid Extremely Oily Beans
Dark roasts with visible oil on the exterior are grinder killers. That oil clumps the grounds and gums up the chute.
If you love dark roasts, clean your grinder more frequently—weekly instead of monthly.
Clean Monthly
At minimum:
- Remove the top burr and brush it clean
- Vacuum the chamber and impeller area
- Run a pipe cleaner through the chute
This takes 5 minutes and prevents 90% of grinder issues.
Don’t Overfill the Hopper
Excessive bean weight can put pressure on the burrs. Keep the hopper less than ¾ full.
When to Seek Professional Repair
If you’ve cleaned everything thoroughly and the problem persists:
- The motor makes no sound at all — Dead motor or blown fuse. Repairable, but requires disassembly and electrical knowledge.
- The motor runs freely but burrs don’t spin — Stripped drive gear. This is the most common “unrepairable at home” issue. Requires replacement gear.
- You smell burning plastic or ozone — Stop immediately. Electrical fault. Contact Breville support.
- Unit is under warranty — Just call Breville. They have excellent support and will often replace the grinder assembly entirely.
For most “stuck” grinders, though, a deep clean and vacuum is the magic bullet. I’ve saved dozens of machines (mine and friends’) this way.
Related Guides:
Mikael
Home espresso enthusiast and Breville specialist. Helping you master the art of coffee brewing from your own kitchen.
Learn more about me →