Fix Breville Portafilter Leak
Leaking group head? Learn how to replace the silicone gasket step-by-step to stop leaks and ensure proper portafilter seal.
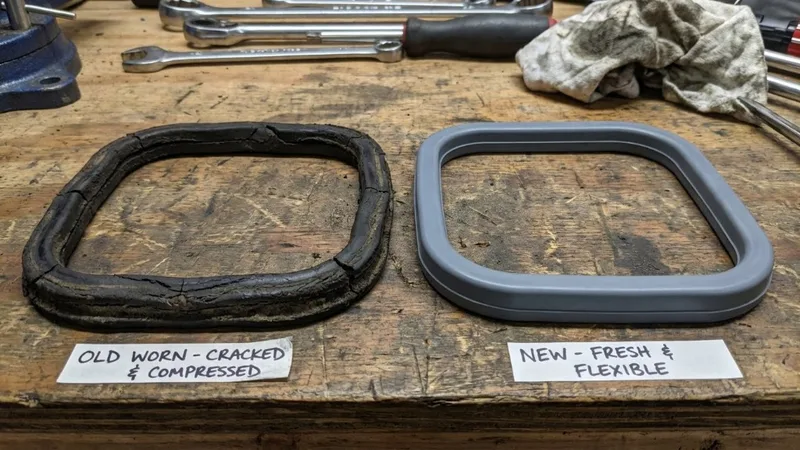
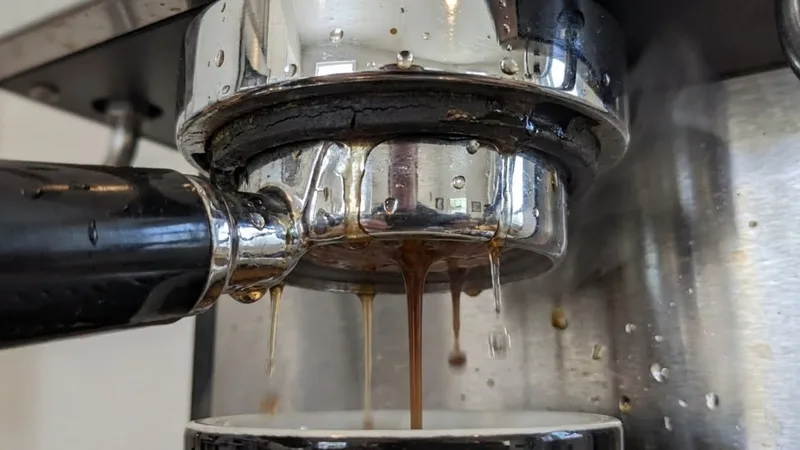
Water dripping from around your portafilter? Difficulty locking the portafilter at 6 o’clock? You likely need a new group head gasket. This silicone seal wears out over time—typically every 6-12 months with regular use—and replacing it is a simple DIY task.
I put this off for way too long on my first machine. The leak started small—just a few drops that I’d wipe away. Eventually, it got bad enough that water was spraying sideways during extraction. A $6 gasket and 15 minutes of work fixed everything. Don’t make my mistake and wait until it’s a mess.
Here’s everything you need to know about diagnosing, replacing, and maintaining your Breville group head gasket.
Why Gaskets Fail
Normal Wear
The silicone gasket sits between your portafilter and the group head, compressed every time you lock in. Over time:
- Heat cycles cause expansion and contraction
- Coffee oils degrade the silicone
- Compression causes permanent deformation
- Hard water deposits can accelerate wear
Signs You Need a New Gasket
| Symptom | What It Means |
|---|---|
| Water leaking around portafilter | Gasket not sealing |
| Portafilter won’t lock at 6 o’clock | Gasket too hard/thick |
| Portafilter locks past 6 o’clock easily | Gasket too worn/thin |
| Visible cracks in gasket | Definitely needs replacement |
| Gasket comes out when removing portafilter | Gasket failed |
Tools and Materials Needed
Required
- New silicone gasket (8.5mm for most Breville models)
- Flathead screwdriver or gasket removal pick
- Clean cloth
Optional
- Food-safe silicone lubricant
- Hex key (for shower screen removal)
- Espresso machine brush
Step-by-Step Gasket Replacement
Step 1: Prepare the Machine
- Turn off your Breville and unplug it
- Wait 30+ minutes for the group head to cool
- Remove the portafilter
Important: Working on a hot group head risks burns and makes the gasket harder to remove.
Step 2: Remove the Shower Screen
- Locate the center screw (Phillips or hex, depending on model)
- Unscrew and remove
- Carefully remove the shower screen
- Remove the dispersion plate (metal disc behind screen)
- Set all parts aside
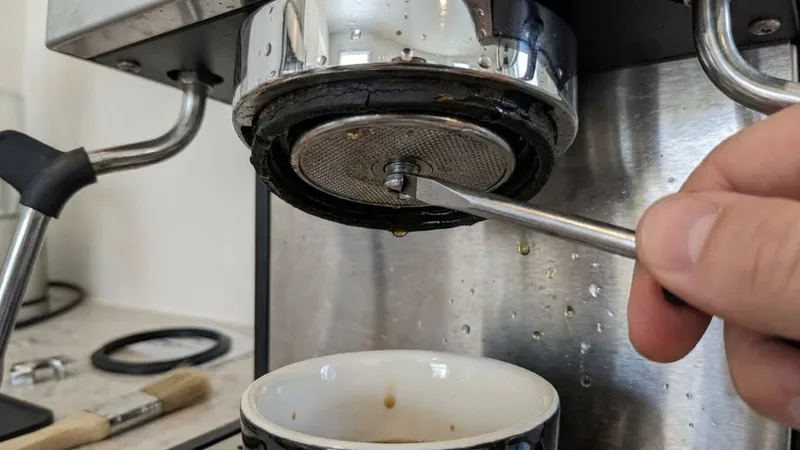
Step 3: Remove the Old Gasket
- Look inside the group head—the gasket is the black rubber ring
- Insert a flathead screwdriver or pick under the gasket edge
- Work around the circumference, prying gently
- The gasket should pop out in one piece (or fragments if very old)

Tip: Stubborn gaskets may need working from multiple angles. Be patient—don’t scratch the group head.
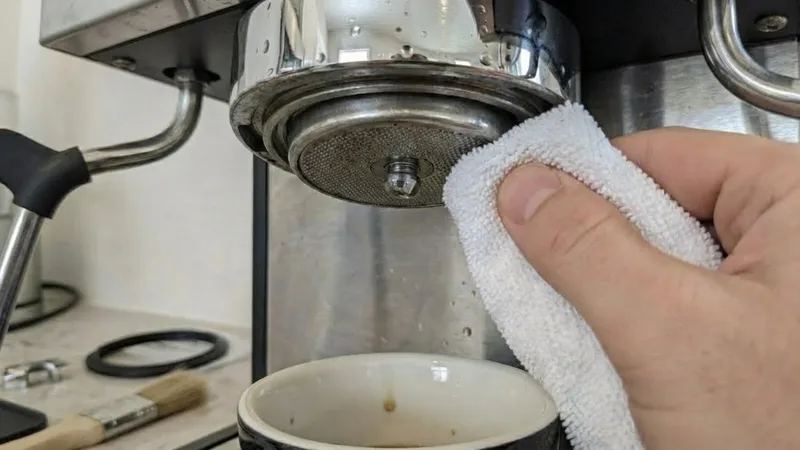
Step 4: Clean the Groove
- Wipe the gasket groove with a clean cloth
- Remove any debris, coffee residue, or old gasket fragments
- Inspect for mineral deposits—clean if present
- Ensure the groove is completely clean and dry
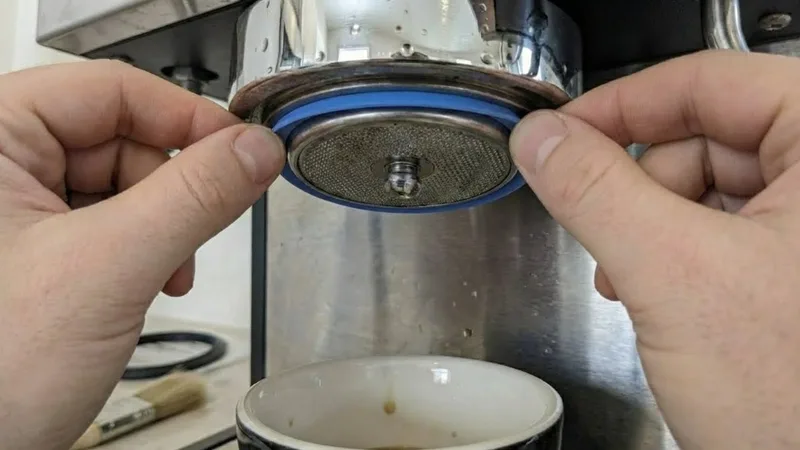
Step 5: Install the New Gasket
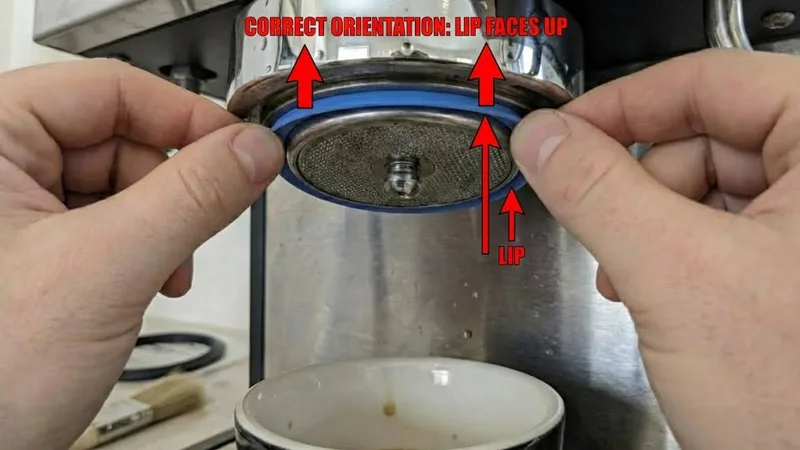
- Check orientation: Most gaskets have a flat side and a lip. For these blue silicone gaskets, the lip typically faces UP (toward the machine).
- Place the gasket into the groove
- Press firmly around the entire circumference
- Ensure it’s seated evenly with no gaps
Optional: Apply a tiny amount of food-safe silicone lubricant to help seating. This also eases future removal.
Step 6: Reassemble
- Replace the dispersion plate
- Replace the shower screen
- Reinstall the center screw
- Tighten firmly but don’t over-torque
Step 7: Test the Seal
- Insert your portafilter (empty is fine)
- Lock it to 6 o’clock position—it should require moderate effort
- Run water without coffee—check for leaks around the portafilter
- If no leaks, you’re done!
Testing After Replacement
Lock Position Check
- Locks at 5 o’clock: Gasket may be too thick or installed incorrectly
- Locks at 6 o’clock with firm pressure: Perfect
- Locks past 6 easily: Gasket too thin (wrong size or still worn old gasket)
Leak Check
- Lock empty portafilter
- Run group head (brew button without coffee)
- Watch for drips around portafilter ears
- Any leakage indicates improper seating—reinstall
First Shot Check
- Pull a regular espresso shot
- Watch for leaks during extraction
- Check shot quality (should be normal)
Choosing the Right Gasket
Breville-Specific Sizing
| Model Series | Gasket Size |
|---|---|
| Barista Express (BES870) | 54mm, 8.5mm thick |
| Infuser (BES840) | 54mm, 8.5mm thick |
| Barista Pro (BES878) | 54mm, 8.5mm thick |
| Dual Boiler (BES920) | 58mm, 8.5mm thick |
OEM vs Third-Party
OEM Breville gaskets:
- Guaranteed fit
- Higher price ($8-15)
- Available from Breville.com
Third-party gaskets:
- Often identical quality
- Lower price ($3-8)
- Check reviews for your specific model
Silicone vs Rubber
Modern gaskets are silicone, which:
- Lasts longer than rubber
- Handles heat better
- Resists coffee oils
- Remains flexible longer
Frequently Asked Questions
How often should I replace the gasket?
Every 6-12 months with daily use, or when you notice seal issues. Some last longer with gentle care.
Can I use third-party gaskets?
Yes—as long as the dimensions match. Most aftermarket gaskets work identically to OEM.
Why is my new gasket leaking?
Check:
- Orientation—lip facing the right direction
- Seating—fully pressed into groove
- Debris—groove was clean before installing
- Size—correct dimensions for your model
What’s the correct gasket orientation?
For most Breville gaskets, the beveled edge (lip) faces DOWN toward where the portafilter locks. But check your specific model—some are reversible.
My portafilter still won’t lock properly after replacement
The new gasket may need a few uses to “break in.” If it’s too tight at first, that’s normal. If still problematic after 10-20 uses, verify you have the correct size.
Related Guides:
Mikael
Home espresso enthusiast and Breville specialist. Helping you master the art of coffee brewing from your own kitchen.
Learn more about me →